Epson ELPDC13 Users Guide - Page 27
Projecting Through a Microscope
 |
View all Epson ELPDC13 manuals
Add to My Manuals
Save this manual to your list of manuals |
Page 27 highlights
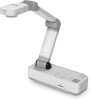
Projecting 27 Projecting Through a Microscope Projected image To display objects as seen through a microscope, use the included microscope adapter. a • Before installing the document camera, make the following settings: - Focus the microscope and adjust the zoom - Press the [Menu] button, and then select Image > Microscope > On. • Images may not be displayed correctly depending on the optical properties of your microscope. a Attach the microscope adapter to the image rotation dial. Push the adapter while holding down the attachment buttons on the microscope adapter. b Position the camera head on the microscope lens. Extend the adapter ring and attach it to the microscope's eye piece. You can extend the adapter ring by up to 5 mm (1/4 inch).
-
 1
1 -
2
-
3
-
4
-
5
-
6
-
7
-
8
-
9
-
10
-
11
-
12
-
13
-
14
-
15
-
16
-
17
-
18
-
19
-
20
-
21
-
 22
22 -
 23
23 -
 24
24 -
 25
25 -
 26
26 -
 27
27 -
 28
28 -
 29
29 -
 30
30 -
 31
31 -
 32
32 -
33
-
34
-
35
-
36
-
37
-
38
-
39
-
40
-
41
-
42
-
43
-
44
-
45
-
46
-
47
-
48
-
49
-
50
-
51
-
52
-
53
-
54
-
55
-
56
-
57
-
58
-
59
-
60
-
61
-
62
 |
 |
