Epson ET-4750 Users Guide - Page 100
Hardware and Sound, Optional Settings
 |
View all Epson ET-4750 manuals
Add to My Manuals
Save this manual to your list of manuals |
Page 100 highlights
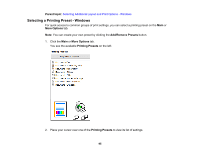
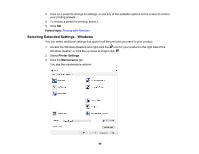
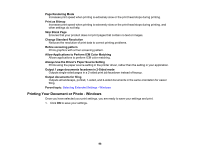
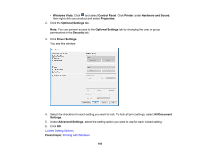
• Windows Vista: Click and select Control Panel. Click Printer under Hardware and Sound, then right-click your product and select Properties. 2. Click the Optional Settings tab. Note: You can prevent access to the Optional Settings tab by changing the user or group permissions in the Security tab. 3. Click Driver Settings. You see this window: 4. Select the checkbox for each setting you want to lock. To lock all print settings, select All Document Settings. 5. Under Advanced Settings, select the setting option you want to use for each locked setting. 6. Click OK. Locked Setting Options Parent topic: Printing with Windows 100
-
 1
1 -
2
-
3
-
4
-
5
-
6
-
7
-
8
-
9
-
10
-
11
-
12
-
13
-
14
-
15
-
16
-
17
-
18
-
19
-
20
-
21
-
22
-
23
-
24
-
25
-
26
-
27
-
28
-
29
-
30
-
31
-
32
-
33
-
34
-
35
-
36
-
37
-
38
-
39
-
40
-
41
-
42
-
43
-
44
-
45
-
46
-
47
-
48
-
49
-
50
-
51
-
52
-
53
-
54
-
55
-
56
-
57
-
58
-
59
-
60
-
61
-
62
-
63
-
64
-
65
-
66
-
67
-
68
-
69
-
70
-
71
-
72
-
73
-
74
-
75
-
76
-
77
-
78
-
79
-
80
-
81
-
82
-
83
-
84
-
85
-
86
-
87
-
88
-
89
-
90
-
91
-
92
-
93
-
94
-
 95
95 -
 96
96 -
 97
97 -
 98
98 -
 99
99 -
 100
100 -
 101
101 -
 102
102 -
 103
103 -
 104
104 -
 105
105 -
106
-
107
-
108
-
109
-
110
-
111
-
112
-
113
-
114
-
115
-
116
-
117
-
118
-
119
-
120
-
121
-
122
-
123
-
124
-
125
-
126
-
127
-
128
-
129
-
130
-
131
-
132
-
133
-
134
-
135
-
136
-
137
-
138
-
139
-
140
-
141
-
142
-
143
-
144
-
145
-
146
-
147
-
148
-
149
-
150
-
151
-
152
-
153
-
154
-
155
-
156
-
157
-
158
-
159
-
160
-
161
-
162
-
163
-
164
-
165
-
166
-
167
-
168
-
169
-
170
-
171
-
172
-
173
-
174
-
175
-
176
-
177
-
178
-
179
-
180
-
181
-
182
-
183
-
184
-
185
-
186
-
187
-
188
-
189
-
190
-
191
-
192
-
193
-
194
-
195
-
196
-
197
-
198
-
199
-
200
-
201
-
202
-
203
-
204
-
205
-
206
-
207
-
208
-
209
-
210
-
211
-
212
-
213
-
214
-
215
-
216
-
217
-
218
-
219
-
220
-
221
-
222
-
223
-
224
-
225
-
226
-
227
-
228
-
229
-
230
-
231
-
232
-
233
-
234
-
235
-
236
-
237
-
238
-
239
-
240
-
241
-
242
-
243
-
244
-
245
-
246
-
247
-
248
-
249
-
250
-
251
-
252
-
253
-
254
-
255
-
256
-
257
-
258
-
259
-
260
-
261
-
262
-
263
-
264
-
265
-
266
-
267
-
268
-
269
-
270
-
271
-
272
-
273
-
274
-
275
-
276
-
277
-
278
-
279
-
280
-
281
-
282
-
283
-
284
-
285
-
286
-
287
-
288
-
289
-
290
-
291
-
292
-
293
-
294
-
295
-
296
-
297
-
298
-
299
-
300
-
301
 |
 |

100
•
Windows Vista:
Click
and select
Control Panel
. Click
Printer
under
Hardware and Sound
,
then right-click your product and select
Properties
.
2.
Click the
Optional Settings
tab.
Note:
You can prevent access to the
Optional Settings
tab by changing the user or group
permissions in the
Security
tab.
3.
Click
Driver Settings
.
You see this window:
4.
Select the checkbox for each setting you want to lock. To lock all print settings, select
All Document
Settings
.
5.
Under
Advanced Settings
, select the setting option you want to use for each locked setting.
6.
Click
OK
.
Locked Setting Options
Parent topic:
Printing with Windows