Epson ET-7750 Start Here - Installation Guide - Page 1
Epson ET-7750 Manual
 |
View all Epson ET-7750 manuals
Add to My Manuals
Save this manual to your list of manuals |
Page 1 highlights
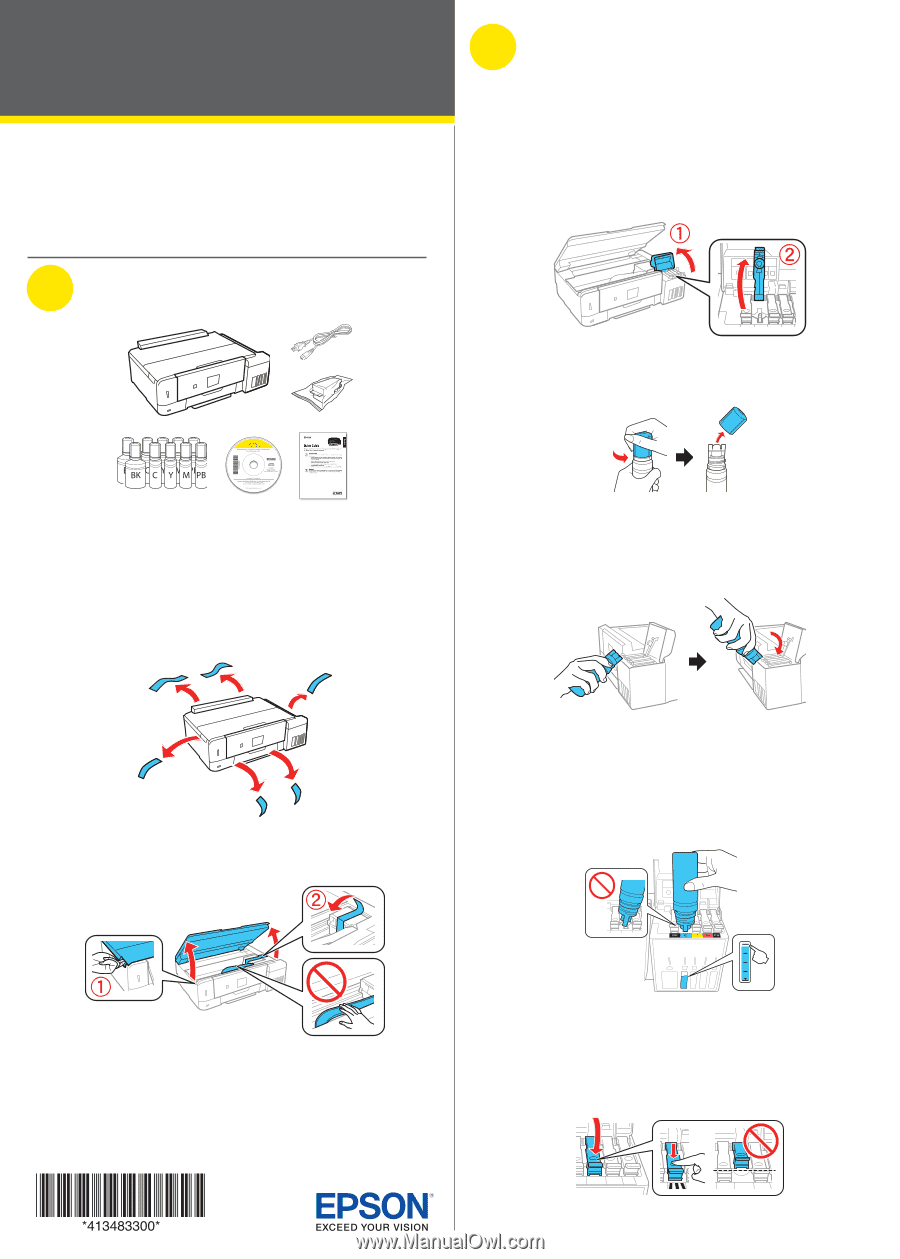
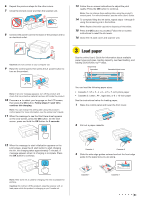
ET-7750 Start Here Read these instructions before using your product. Note for Spanish speakers/Nota para hispanohablantes: Para obtener instrucciones de configuración en español, consulte la Guía de instalación en www.epson.com/support/et7750sp (requiere una conexión a Internet). 1 Unpack 2 Fill ink tanks Note: This product requires careful handling of ink. If ink spills, wipe it off immediately with a damp towel to avoid permanent stains. If ink gets on your clothes or belongings, it may not come off. Warning: Keep the ink bottles out of the reach of children and do not drink the ink. 1 Open the ink tank cover, then open the cap for the ink tank you are going to fill. 2 Unpack one of the ink bottles. Hold the ink bottle upright and slowly turn the bottle cap to remove it. Note: • Do not open the ink bottles until you are ready to fill the ink tanks. The ink bottles are vacuum packed to maintain reliability. • The CD/DVD tray is taped to the bottom of cassette 2. • For instructions on how to replace the included replacement maintenance box, see the online User's Guide. 1 Remove all protective materials from the product. Caution: Do not shake or squeeze the ink bottle. Do not touch the top of the ink bottle after its cap is removed. 3 Position the top of the ink bottle along the slot in front of the filling port, then slowly stand the bottle up to insert it. 2 Lift up the scanner unit. Remove all protective materials from inside the product. Note: Refer to the color-coded sticker to identify the color of each tank. Do not force the bottles into position; they are keyed for each color. 4 Wait for the ink to fill the tank. Do not squeeze the bottle. Ink flows into the tank and stops automatically when the ink is filled to the upper line. Caution: Do not touch the flat white cable or the ink tubes and their translucent cover. Note: If ink does not flow from the bottle, lift and reinsert the bottle. 5 When the ink tank is full, remove the ink bottle and securely close the ink tank cap. Place the ink bottle aside; you will need it later. Note: Replace the bottle cap and tighten it.
-
 1
1 -
 2
2 -
 3
3 -
 4
4
 |
 |