Epson ET-7750 Start Here - Installation Guide - Page 2
Load paper - photo quality
 |
View all Epson ET-7750 manuals
Add to My Manuals
Save this manual to your list of manuals |
Page 2 highlights
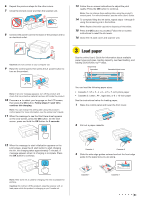
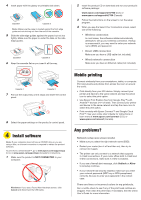
6 Repeat the previous steps for the other colors. 7 Close the ink tank cover and then the scanner unit. 8 Connect the power cord to the back of the product and to an electrical outlet. 13 Follow the on-screen instructions to adjust the print quality. Press the OK button to continue. Note: You can change these settings later using the product's control panel. For more information, see the online User's Guide. 14 To complete filling the ink tanks, repeat steps 1 through 6 using the remaining ink in the bottles. Note: Replace the bottle cap before disposing of the bottles. 15 Press the OK button to proceed. Follow the on-screen instructions to reset the ink levels. 16 Close the ink tank cover and scanner unit. Caution: Do not connect to your computer yet. 9 Raise the control panel, then press the power button to turn on the product. 3 Load paper See the online User's Guide for information about available paper types and sizes, loading capacity, rear feed loading, and loading CD/DVD/Blu-ray™ discs. Output tray Cassette 1 Cassette 2/front cover Note: If an error message appears, turn off the product and check that no protective material has been left inside the product. 10 Press or to select your language on the LCD screen, then press the OK button. Follow steps 11 and 12 to continue ink charging. Note: You can change this setting later using the product's control panel. For more information, see the online User's Guide. 11 When the message to see the Start Here sheet appears on the LCD screen, press the OK button. On the next screen, press and hold the OK button for 3 seconds. You can load the following paper sizes: • Cassette 1: 3.5 × 5-, 4 × 6-, or 5 × 7-inch photo paper • Cassette 2: Letter-, A4-, legal-size, or 8 × 10-inch paper See the instructions below for loading paper. 1 Raise the control panel and lower the front cover. 2 Pull out a paper cassette. 12 When the message to start initialization appears on the LCD screen, press the start button to start charging the ink. Ink charging takes approximately 7 minutes. A message appears when ink charging is complete. Press the OK button to continue. Cassette 1 Cassette 2 3 Slide the side edge guides outward and set the front edge guide to the paper size you are using. Note: After some ink is used for charging, the rest is available for printing. Caution: Do not turn off the product, raise the scanner unit, or load paper while the product is charging or you'll waste ink. Cassette 1 Cassette 2
-
 1
1 -
 2
2 -
 3
3 -
 4
4
 |
 |
