Epson Equity 386/25 Product Support Bulletin(s) - Page 4
Using High Capacity ESDI and SCSI Hard Disk Drives with the Current - 20
 |
View all Epson Equity 386/25 manuals
Add to My Manuals
Save this manual to your list of manuals |
Page 4 highlights
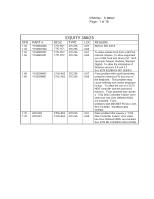
Subject: Using High Capacity ESDI and SCSI Hard Disk Drives with the Current Equity Series Computers Date: 10/10/90 Page(s): 1 of 2 PSB No: S-0091A Originator: PNM The purpose of this bulletin is to provide some specific examples of how to install high capacity ESDI and SCSI hard disk drives in the current Equity Series computers. The largest drive directly supported by the ROM BIOS (ver 220) in the Equity II+ and Equity Ill+ has a capacity of 130Mb, while the largest supported directly by the ROM BIOS in the Equity lIe, 386SX, 386/20 and 386/25 is 153Mb. To allow our units to be used in stand alone and especially network environments that require higher drive capacities, the use of the Adaptec ACB 2320 controller (available with the Equity 386/20) with the optional ACB-BIOS (available from Adaptec) will provide support for a variety of ESDI drives up to 314Mb. The AC&BIOS also has the ability to read the ESDI drive parameters from the drive itself. This will allow it to configure virtually any ESDI drive. NOTE: The Adaptec BIOS ROM should be installed in location U25. In order for it to work, the jumper J13 pin 1 must be installed. Caution should be used when ordering the BIOS ROM as problems have been experienced when using version B. Versions A and C perform normally. The WD1007V-SE1 controller is another option that can be used with high capacity ESDI drives that are not supported by the ROM BIOS drive tables. When using this controller' make sure that all pins on jumper on W1 are open. You can run SETUP and use Type 1 for the drive type or let the controller automatically set it at the end of the low level format routine provided by the controller's BIOS. To start the WD-BIOS Format Utility, run DEBUG and enter G=CC00:5. This will bring up a menu listing the operations that are available. Run the low level format and either enter the defective blocks listed on the drive by hand or let the program enter them automatically. Continue with the "Verify" and "Surface Analysis" utilities and finally finish with the "Set Drive Type and Exit". At this point there are 5 options from which to choose using the "+" and 'I-" keys to toggle through the available choices. Select the 'Translation Option-63 SPT (Sectors Per Track)" if the hard drive has more than 1024 cylinders or "Non-Translation" for drives with less than 1024 cylinders.
-
 1
1 -
 2
2 -
 3
3 -
 4
4 -
 5
5 -
 6
6
 |
 |
