Epson FX-850 Product Information Guide - Page 4
FX - 850/1050 DOT - MATRIX PRINTER, Software - problem
 |
View all Epson FX-850 manuals
Add to My Manuals
Save this manual to your list of manuals |
Page 4 highlights
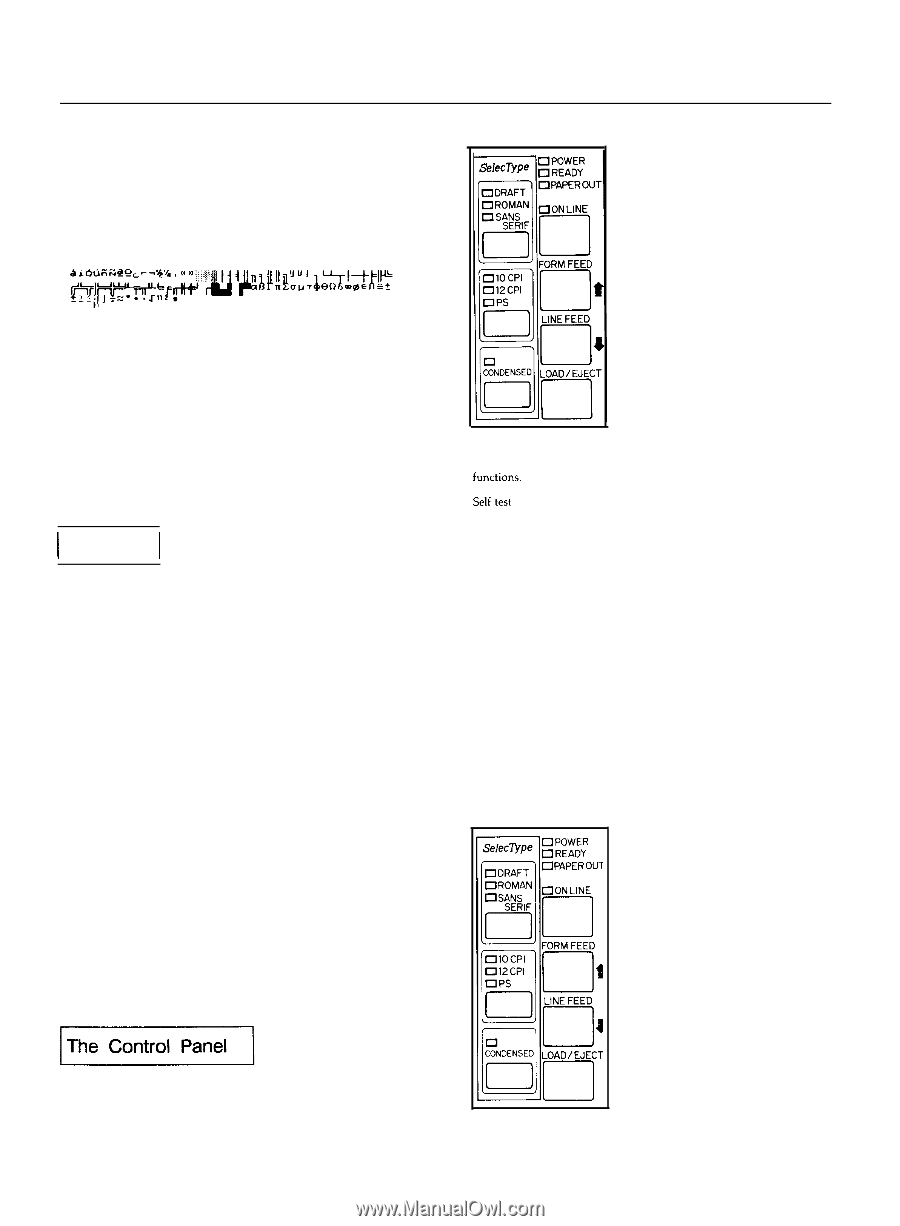
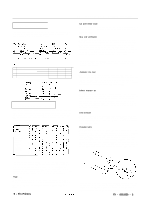
FX - 850/1050 DOT - MATRIX PRINTER The printouts below show which characters are printed in each table. Italics 0123456789: ;?@ABCDEFGH IJKLRNOPQRSTUVWXYZ[\]^_ abcdefghijklmnop qrstuvwxyz{:} Epson Extended Graphics Note: You may need to use the ESC 6 command to print some of the Extended Graphics characters. See Appendix 8. Printer mode When DIP switch 1-4 is on, the printer operates in the IBM emulation mode. When it is off, the printer operates in the Epson ESC/P mode. In the IBM emulation mode, DIP switch 1-3 controls the automatic carriage return. When switch 1-3 is off, a carriage return is added to each line feed. The functions of DIP switches 1-6, 1-7. and 1-8 are also different when using the printer in the IBM emulation mode. 1 Software 1 Now that you've set up and tested the printer, you need to start using it with your application programs. Most application programs let you specify the type of printer you're using so that the program can take full advantage of the printer's features. Many programs provide an installation or setup procedure that present\ a list of printers to choose from. If your application program has a printer selection menu. use the instructions below. Using printer selection menus If your software has a printer selection menu, simply choose FX-850 or FX-1050. If the menu does not list either of these printers, choose one of the following. They are listed in order of preference. FX-850 FX-86e EX-800 FX-85 FX-80+ FX-80 FX LX MX Epson printer Draft printer FX-1050 FX-286e EX-1000 FX-286 FX-185 FX-100+ FX-100 FX LX MX Epson printer Draft printer If you plan to use the IBM emulation mode, choose IBM Proprinter (if you have an FX-850). IBM Proprinter XL (if you have an FX-1050). IBM Graphics printer, or IBM printer, in that order of preference. The buttons on the control panel let you control many of the printer settings. The control panel also has Indicator lights so you can check the current status of the printer's various settings. FX - 850/1050 - 4 12/12/88 Lights POWER On when the power switch is on and power is supplied. READY On when the printer is ready to accept input data. Flickers when receiving data. PAPER OUT On when the printer is out of paper or when continuous paper is in the standby position. ON LINE On when the printer is on line and ready to accept data. This light flashes immediately after you load paper or use short tear-off to Indicate that micro-adjustment can be used. Other control panel features The control panel of the FX also gives you access to several special Microadjustment Data dump Buttons By holding down the FORM FEED or LINE FEED button while you turn on the printer, you can start the printer's self test. This prints out the DIP switch settings and the characters in the printer's ROM (Read Only Memory). See the section on the self test in Chapter 1 for more information. By pressing the FORM FEED and LINE FEED buttons immediately after loading paper or using short tearoff, you can make fine adjustments to the loading and short tear-off positions. See the section on microadjustment in Chapter 2 for more information. By holding down both the FORM FEED and LINE FEED buttons while you turn on the printer, you can turn on the data dump mode. This feature allows advanced users to diagnose many problems. See the section on the data dump mode in Chapter 6 for more information ON LINE This button controls the printer's on line/off line status. When the printer is on line, the printer can receive and print data from the computer. It-3 )Y ROUl FORM FEED When the printer is off line, press this button to eject a single sheet of paper or advance continuous paper to the top of the next page. When the printer is on line, you can use the micro-adjustment feature by pressing this button to advance the paper. LINE FEED When the printer is off line, press this button to feed the paper one line. or hold it down to feed the paper continuously. When the printer is on line, you can use the microadjustment feature by pressing this button to reverse the paper. LOAD/EJECT When the printer is off line, press this button to load paper if paper is not loaded, or to elect it if paper is loaded. (Single sheet paper is ejected forward and continuous paper is ejected backward.) 9 - Pin Printers
-
 1
1 -
 2
2 -
 3
3 -
 4
4 -
 5
5 -
 6
6 -
 7
7 -
 8
8
 |
 |