Epson FX-870 User Manual - Page 92
PAUSE, Note: You, Using the Printer Options
 |
View all Epson FX-870 manuals
Add to My Manuals
Save this manual to your list of manuals |
Page 92 highlights
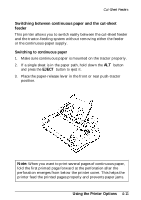
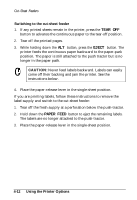
Cut-Sheet Feeders 3. Press the two cut-sheet feeders together while pushing firmly on the tab locks. Make sure the two cut-sheet feeders are locked securely together. 4. Install the assembled double-bin cut-sheet feeder on the printer. See Installing a cut-sheet feeder earlier in this chapter. 5. Load paper into each bin. See the sections on loading paper in this chapter. You can now use either cut-sheet feeder to load paper. Note: You can also insert single sheets using the front paper slot. The high-capacity cut-sheet feeder becomes BIN 1 and the single-bin cut-sheet feeder becomes BIN 2. Select the bin number by holding down the ALT button and pressing the PAUSE button when the printer is out of paper. When you select BIN 1, the printer beeps once. When you select BIN 2, it beeps twice. You can also specify the bin number by using your application software as described in your software user's manual or by using the software command described in Chapter 8. 4-10 Using the Printer Options
-
 1
1 -
2
-
3
-
4
-
5
-
6
-
7
-
8
-
9
-
10
-
11
-
12
-
13
-
14
-
15
-
16
-
17
-
18
-
19
-
20
-
21
-
22
-
23
-
24
-
25
-
26
-
27
-
28
-
29
-
30
-
31
-
32
-
33
-
34
-
35
-
36
-
37
-
38
-
39
-
40
-
41
-
42
-
43
-
44
-
45
-
46
-
47
-
48
-
49
-
50
-
51
-
52
-
53
-
54
-
55
-
56
-
57
-
58
-
59
-
60
-
61
-
62
-
63
-
64
-
65
-
66
-
67
-
68
-
69
-
70
-
71
-
72
-
73
-
74
-
75
-
76
-
77
-
78
-
79
-
80
-
81
-
82
-
83
-
84
-
85
-
86
-
 87
87 -
 88
88 -
 89
89 -
 90
90 -
 91
91 -
 92
92 -
 93
93 -
 94
94 -
 95
95 -
 96
96 -
 97
97 -
98
-
99
-
100
-
101
-
102
-
103
-
104
-
105
-
106
-
107
-
108
-
109
-
110
-
111
-
112
-
113
-
114
-
115
-
116
-
117
-
118
-
119
-
120
-
121
-
122
-
123
-
124
-
125
-
126
-
127
-
128
-
129
-
130
-
131
-
132
-
133
-
134
-
135
-
136
-
137
-
138
-
139
-
140
-
141
-
142
-
143
-
144
-
145
-
146
-
147
-
148
-
149
-
150
-
151
-
152
-
153
-
154
-
155
-
156
-
157
-
158
-
159
-
160
-
161
-
162
-
163
-
164
-
165
-
166
-
167
-
168
-
169
-
170
-
171
-
172
-
173
-
174
-
175
-
176
-
177
-
178
-
179
-
180
-
181
-
182
-
183
-
184
 |
 |
