Epson G7000W Users Guide - Page 52
Caution, Lens Shift, Release, Parent topic, control panel button.
 |
View all Epson G7000W manuals
Add to My Manuals
Save this manual to your list of manuals |
Page 52 highlights
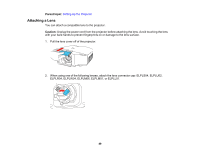
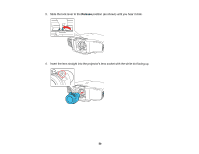
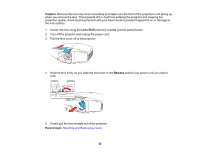
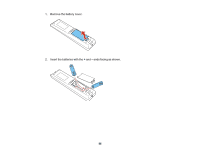
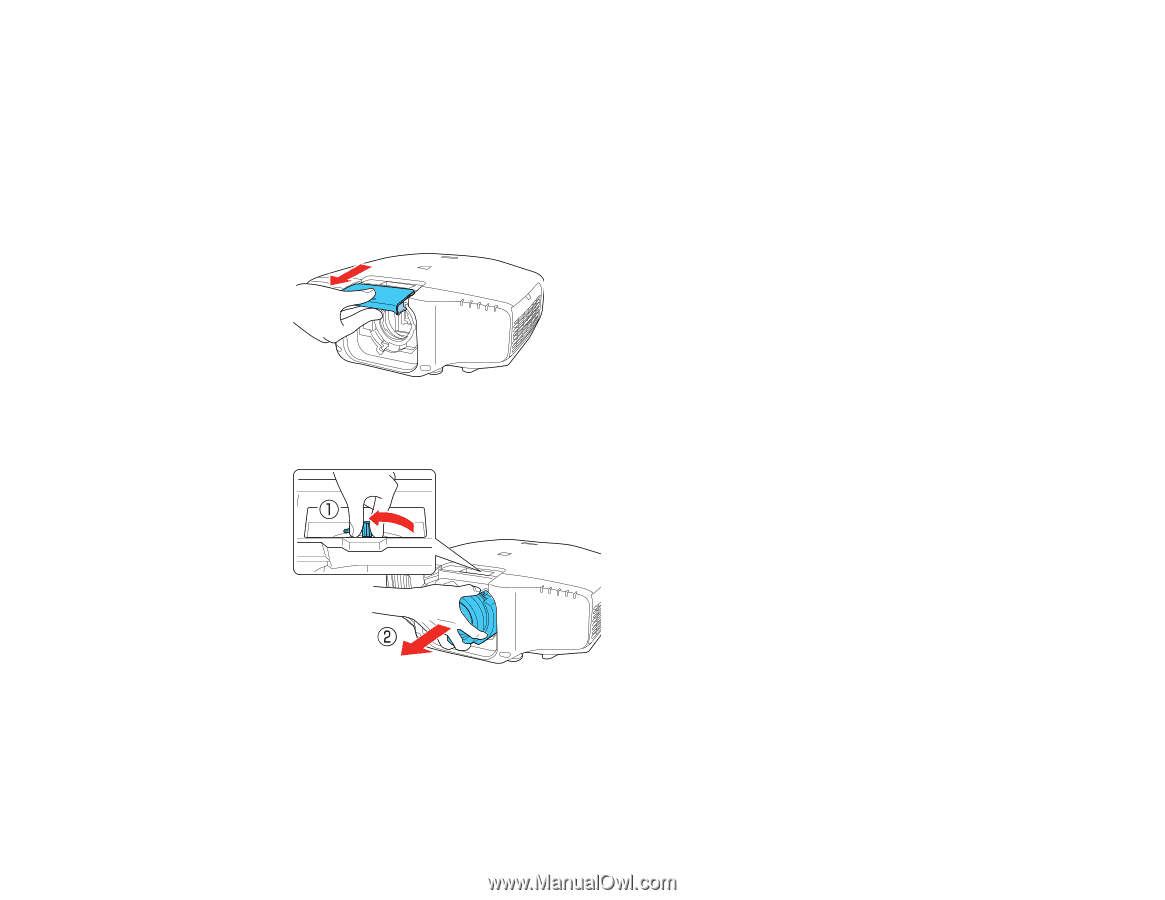
Caution: Remove the lens only when necessary and make sure the front of the projector is not facing up when you remove the lens. This prevents dirt or dust from entering the projector and lowering the projection quality. Avoid touching the lens with your bare hands to prevent fingerprints on or damage to the lens surface. 1. Center the lens using the Lens Shift (remote) or Lens (control panel) button. 2. Turn off the projector and unplug the power cord. 3. Pull the lens cover off of the projector. 4. Hold the lens firmly as you slide the lock lever to the Release position (as shown) until you hear it click. 5. Gently pull the lens straight out of the projector. Parent topic: Attaching and Removing a Lens 52
-
 1
1 -
2
-
3
-
4
-
5
-
6
-
7
-
8
-
9
-
10
-
11
-
12
-
13
-
14
-
15
-
16
-
17
-
18
-
19
-
20
-
21
-
22
-
23
-
24
-
25
-
26
-
27
-
28
-
29
-
30
-
31
-
32
-
33
-
34
-
35
-
36
-
37
-
38
-
39
-
40
-
41
-
42
-
43
-
44
-
45
-
46
-
 47
47 -
 48
48 -
 49
49 -
 50
50 -
 51
51 -
 52
52 -
 53
53 -
 54
54 -
 55
55 -
 56
56 -
 57
57 -
58
-
59
-
60
-
61
-
62
-
63
-
64
-
65
-
66
-
67
-
68
-
69
-
70
-
71
-
72
-
73
-
74
-
75
-
76
-
77
-
78
-
79
-
80
-
81
-
82
-
83
-
84
-
85
-
86
-
87
-
88
-
89
-
90
-
91
-
92
-
93
-
94
-
95
-
96
-
97
-
98
-
99
-
100
-
101
-
102
-
103
-
104
-
105
-
106
-
107
-
108
-
109
-
110
-
111
-
112
-
113
-
114
-
115
-
116
-
117
-
118
-
119
-
120
-
121
-
122
-
123
-
124
-
125
-
126
-
127
-
128
-
129
-
130
-
131
-
132
-
133
-
134
-
135
-
136
-
137
-
138
-
139
-
140
-
141
-
142
-
143
-
144
-
145
-
146
-
147
-
148
-
149
-
150
-
151
-
152
-
153
-
154
-
155
-
156
-
157
-
158
-
159
-
160
-
161
-
162
-
163
-
164
-
165
-
166
-
167
-
168
-
169
-
170
-
171
-
172
-
173
-
174
-
175
-
176
-
177
-
178
-
179
-
180
-
181
-
182
-
183
-
184
-
185
-
186
-
187
-
188
-
189
-
190
-
191
-
192
-
193
-
194
-
195
-
196
-
197
-
198
-
199
-
200
-
201
-
202
-
203
-
204
-
205
-
206
-
207
-
208
-
209
-
210
-
211
-
212
-
213
-
214
-
215
-
216
-
217
-
218
-
219
-
220
-
221
-
222
-
223
-
224
-
225
-
226
-
227
-
228
-
229
-
230
-
231
-
232
-
233
-
234
-
235
-
236
-
237
-
238
-
239
-
240
-
241
-
242
-
243
-
244
-
245
-
246
-
247
-
248
-
249
-
250
-
251
-
252
-
253
-
254
-
255
-
256
-
257
-
258
-
259
-
260
-
261
-
262
-
263
-
264
-
265
-
266
-
267
-
268
-
269
-
270
-
271
-
272
-
273
-
274
-
275
-
276
-
277
-
278
-
279
-
280
-
281
-
282
-
283
-
284
-
285
-
286
-
287
-
288
-
289
-
290
-
291
-
292
-
293
-
294
-
295
-
296
-
297
-
298
-
299
 |
 |
52
Caution:
Remove the lens only when necessary and make sure the front of the projector is not facing up
when you remove the lens. This prevents dirt or dust from entering the projector and lowering the
projection quality. Avoid touching the lens with your bare hands to prevent fingerprints on or damage to
the lens surface.
1.
Center the lens using the
Lens Shift
(remote) or
Lens
(control panel) button.
2.
Turn off the projector and unplug the power cord.
3.
Pull the lens cover off of the projector.
4.
Hold the lens firmly as you slide the lock lever to the
Release
position (as shown) until you hear it
click.
5.
Gently pull the lens straight out of the projector.
Parent topic:
Attaching and Removing a Lens