Epson LQ-1500 User Manual - Page 17
Installing the Ribbon Cartridge, Printer parts
 |
View all Epson LQ-1500 manuals
Add to My Manuals
Save this manual to your list of manuals |
Page 17 highlights
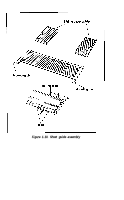
Figure 1-6. Printer parts Once you identify these parts, you will know enough about the printer to get started. This manual will help you identify other parts as the need arises. Installing the Ribbon Cartridge The LQ-1500's ribbon cartridge is easy to install, and it won't get your hands dirty. Follow these steps for a quick installation. 1. Close the paper bail so that it is against the platen. 2. Grasp the print head by the finned part and slide it along the silver rods until it is positioned at 40 on the paper bail scale. You will need space on either side of the print head when you insert the ribbon cartridge. 3. Rotate the ribbon cartridge take-up knob in the direction indicated by the arrow next to it so that the ribbon is tight (see Figure 1-7). Don't worry about wasting the ribbon by turning too much; the ribbon is a continuous loop inside the ribbon cartridge. 9
-
 1
1 -
2
-
3
-
4
-
5
-
6
-
7
-
8
-
9
-
10
-
11
-
 12
12 -
 13
13 -
 14
14 -
 15
15 -
 16
16 -
 17
17 -
 18
18 -
 19
19 -
 20
20 -
 21
21 -
 22
22 -
23
-
24
-
25
-
26
-
27
-
28
-
29
-
30
-
31
-
32
-
33
-
34
-
35
-
36
-
37
-
38
-
39
-
40
-
41
-
42
-
43
-
44
-
45
-
46
-
47
-
48
-
49
-
50
-
51
-
52
-
53
-
54
-
55
-
56
-
57
-
58
-
59
-
60
-
61
-
62
-
63
-
64
-
65
-
66
-
67
-
68
-
69
-
70
-
71
-
72
-
73
-
74
-
75
-
76
-
77
-
78
-
79
-
80
-
81
-
82
-
83
-
84
-
85
-
86
-
87
-
88
-
89
-
90
-
91
-
92
-
93
-
94
-
95
-
96
-
97
-
98
-
99
-
100
-
101
-
102
-
103
-
104
-
105
-
106
-
107
-
108
-
109
-
110
-
111
 |
 |
