Epson Livingstation LS57P2 Quick Start - Page 5
Viewing a Slide Show, Selecting a Photo and Printing It, Storing Photos on a CD, Prev. <, Next >
 |
View all Epson Livingstation LS57P2 manuals
Add to My Manuals
Save this manual to your list of manuals |
Page 5 highlights
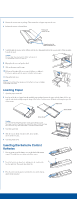
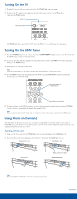
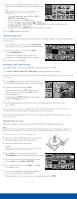
3 After a few seconds, the Photo screen appears. It displays the photos on your card and outlines the first one in gold: Note If the photo viewer doesn't come up automatically, press the Photo View button on the TV panel or remote control. • To select a different photo, press the Prev. , Select , or Select button. • To enlarge a photo, press the Enter button. • To zoom into the photo further, press the Photo Zoom + button. Use the Prev. , Select , and Select buttons to adjust the viewing position. Press Photo Zoom - to zoom back out. • To rotate a photo, press the Rotate button when the photo isn't zoomed. 4 Press the Exit button when you're done. Viewing a Slide Show You can view your photos automatically, for a few seconds each, by running a slide show. You can view all the photos or just selected ones. 1 Press the 2 button on the remote control. The Slide Show menu on the left of the screen opens: 2 To view all your photos in a slide show, press Enter to select View Slide Show. The first photo is enlarged and appears on the screen. It displays for 3 seconds, then the next photo is displayed. 3 To end the slide show, press Exit. Selecting a Photo and Printing It You can print one photo at a time from a digital photo card (memory card) or CD-R/RW. 1 Press Prev. , Select , or Select to highlight the photo you want to print. 2 If you want to print your photo cropped, zoom into it as described above. Only the part you see on the screen will be printed. 3 Press the Print button on the TV panel or remote control. You see the Print Settings screen: 4 To print one copy of the photo, press Enter. To print multiple copies, press Next > until the number in the Copies box is correct. Then press Enter. After a moment, printing starts. During printing, the Printer light flashes. When printing is finished, the Printer light turns off. 5 To print additional photos, repeat these steps. You can send multiple photos for printing at one time, up to 15 photos. If you see a printing error message, select Yes to check for the problem. Then follow the on-screen instructions to solve the problem and continue printing. For additional help, see your User's Guide. When you're finished printing, remove the borders from the edges of your photo by bending them back and forth and tearing them off. Storing Photos on a CD Before you save photos on a CD, make sure the external CD-R/RW drive is plugged in and turned on. Note Make sure that your disc can be written to at 4X speed. Some high-speed discs don't support 4X writiing, so check your disc specifications before inserting it into the drive. See your User's Guide for additional details on supported discs and formats. 1 Press the eject button on the drive to open the tray. 2 Place a new, blank CD-R/RW disc on the tray with the label side facing up. Make sure the disc lays flat in the tray. 3 Press the eject button again to close the tray. Caution Always use the eject button to open and close the tray. Pushing in the tray may damage the drive and your disc. 4 Press the 3 button on the remote control to open the CD-R/RW Writer menu. 5 To write all of the photos on your digital photo card to the CD, press Enter to select Write to CD-R/RW. 6 You see a confirmation message. Press Enter to select Yes or press Exit to cancel. 7 You see a writing confirmation message while your photos are written to the CD and the drive light flashes. When it's finished, the CD tray opens and you see a completion message. Press Enter.
-
 1
1 -
 2
2 -
 3
3 -
 4
4 -
 5
5 -
 6
6
 |
 |
