Epson NX400 Quick Guide - Page 12
Restoring and Cropping Photos - software
 |
UPC - 010343872103
View all Epson NX400 manuals
Add to My Manuals
Save this manual to your list of manuals |
Page 12 highlights
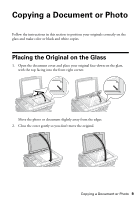
Restoring and Cropping Photos You can restore old, faded photos to their original brilliance. You can also crop your photos to zoom in on the subject. Note: To restore photos larger than 5 × 7 inches, use the NX400 Series software on your computer. 1. Press the P On button to turn on the NX400 Series. 2. Load 4 × 6-inch, 5 × 7-inch, letter-size, or A4-size Epson photo paper. 3. Place your original photo on the document table. Note: You can copy up to 2 photos at the same time. Place them 0.2 inches (5 mm) apart. 4. Press the Photo button, and press OK. 5. To turn on Color Restoration, press r and select On and press OK. (If your photo is not faded, do not turn on Color Restoration.) 6. Press OK again to prescan your photo. You see these settings over a preview of your photo: 7. To print more than 1 copy, press + or - to select the number. 8. If you want to crop your photos and enlarge the resulting image area to fit onto your paper, press Display/Crop. ■ To resize the image area, press + or -. ■ To move the image area, use the arrow buttons. ■ To check the zoomed image, press OK. After you are done cropping your photo, press OK. 9. To change print settings, press Menu and select your settings (see page 13). When you're done, press OK. 10. Press x Start to begin copying. If you need to cancel copying, press y Stop/ Clear Settings. 12 Copying a Document or Photo
-
 1
1 -
2
-
3
-
4
-
5
-
6
-
 7
7 -
 8
8 -
 9
9 -
 10
10 -
 11
11 -
 12
12 -
 13
13 -
 14
14 -
 15
15 -
 16
16 -
 17
17 -
18
-
19
-
20
-
21
-
22
-
23
-
24
-
25
-
26
-
27
-
28
-
29
-
30
-
31
-
32
-
33
-
34
-
35
-
36
-
37
-
38
-
39
-
40
-
41
-
42
-
43
-
44
-
45
-
46
-
47
-
48
 |
 |
