Epson PictureMate Express Edition Using PictureMate With a Computer - Page 3
Installing Software and Connecting PictureMate, Installing PictureMate for Windows - windows 7
 |
View all Epson PictureMate Express Edition manuals
Add to My Manuals
Save this manual to your list of manuals |
Page 3 highlights
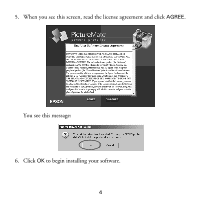
Installing Software and Connecting PictureMate To connect PictureMate® you'll need this cable: Type A to B USB cable If you don't have a USB cable, you can buy one from your local computer dealer or from Epson®. See the inside back cover for details. When you're ready to start, see the section for your computer system: ■ For Windows®, see below. ■ For Macintosh,® see page 9. Installing PictureMate for Windows First make sure PictureMate is NOT CONNECTED to your computer, and REMOVE your memory card, if it's inserted. Then: 1. Press the P On button to turn on PictureMate. 2. Turn on your computer. 3. Wait a minute for your computer to start up, then insert the PictureMate CD in your CD-ROM or DVD drive. Note: If you have any problems installing the PictureMate software, see page 16. 1
-
 1
1 -
 2
2 -
 3
3 -
 4
4 -
 5
5 -
 6
6 -
 7
7 -
 8
8 -
 9
9 -
10
-
11
-
12
-
13
-
14
-
15
-
16
-
17
-
18
-
19
 |
 |
