Epson PictureMate PM-400 Quick Guide and Warranty - Page 8
Printing Photos From the LCD Screen
 |
View all Epson PictureMate PM-400 manuals
Add to My Manuals
Save this manual to your list of manuals |
Page 8 highlights
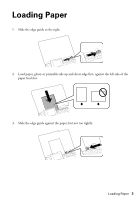
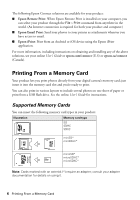
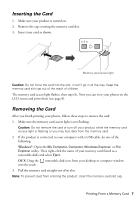
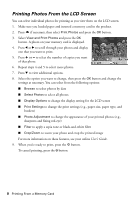
Printing Photos From the LCD Screen You can select individual photos for printing as you view them on the LCD screen. 1. Make sure you loaded paper and inserted a memory card in the product. 2. Press if necessary, then select Print Photos and press the OK button. 3. Select View and Print Photos and press the OK button. A photo on your memory card is displayed. 4. Press l or r to scroll through your photos and display one that you want to print. 5. Press + or - to select the number of copies you want of that photo. 6. Repeat steps 4 and 5 to select more photos. 7. Press d to view additional options. 8. Select the option you want to change, then press the OK button and change the settings as necessary. You can select from the following options: ■ Browse to select photos by date ■ Select Photos to select all photos ■ Display Options to change the display setting for the LCD screen ■ Print Settings to change the print settings (e.g., paper size, paper type, and borders) ■ Photo Adjustment to change the appearance of your printed photos (e.g., sharpness and fixing red-eye) ■ Filter to apply a sepia tone or black-and-white filter ■ Crop/Zoom to zoom your photo and crop the printed image For more information on these features, see your online User's Guide. 9. When you're ready to print, press the x button. To cancel printing, press the y button. 8 Printing From a Memory Card
-
 1
1 -
2
-
 3
3 -
 4
4 -
 5
5 -
 6
6 -
 7
7 -
 8
8 -
 9
9 -
 10
10 -
 11
11 -
 12
12 -
 13
13 -
14
-
15
-
16
-
17
-
18
-
19
-
20
-
21
-
22
-
23
-
24
-
25
-
26
-
27
-
28
-
29
-
30
-
31
-
32
-
33
-
34
-
35
-
36
-
37
-
38
-
39
-
40
-
41
-
42
-
43
-
44
-
45
-
46
-
47
-
48
-
49
-
50
-
51
-
52
 |
 |
