Epson PowerLite 4300 Quick Reference - Page 2
Installing the Manuals, Turning the Projector On, Switching Between Image Sources
 |
View all Epson PowerLite 4300 manuals
Add to My Manuals
Save this manual to your list of manuals |
Page 2 highlights
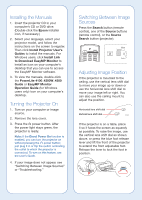
Installing the Manuals 1. Insert the projector CD in your computer's CD or DVD drive. (Double-click the Epson installer icon, if necessary.) 2. Select your language, select your projector model, and follow the instructions on the screen to register. Then click Install Projector User's Guides to install the manuals. For Windows users, click Install Link to Download EasyMP Monitor to install an icon on your computer's desktop that you can use to access the EasyMP Monitor software. 3. To view the manuals, double-click the PowerLite 4100_4200W_4300 Guide or EasyMP Monitor Operation Guide (for Windows users only) icon on your computer's desktop. Turning the Projector On 1. Turn on your computer or image source. 2. Remove the lens cover. 3. Press the power button. After the power light stays green, the projector is ready. Note: If the Direct Power On function is enabled, you can turn the projector on without pressing the power button; just plug it in or flip the switch controlling the outlet to which the projector is connected. To turn on this feature, see the User's Guide. 4. If your image does not appear, see "Switching Between Image Sources" or "Troubleshooting." Switching Between Image Sources Press the Search button (remote control), one of the Source buttons (remote control), or the Source Search button (projector). Adjusting Image Position If the projector is mounted to the ceiling, use the vertical lens shift dial to move your image up or down or use the horizontal lens shift dial to move your image left or right. You can also use the ceiling mount to adjust the position. Horizontal lens shift dial Vertical lens shift dial If the projector is on a table, place it so it faces the screen as squarely as possible. To raise the image, use the vertical lens shift dial as shown above, or press the blue foot release lever and lift the front of the projector to extend the front adjustable foot. Release the lever to lock the foot in position.
-
 1
1 -
 2
2 -
 3
3 -
 4
4 -
 5
5 -
 6
6
 |
 |