Epson PowerLite 715c Product Information Guide - Page 8
Using EasyMP, Using the Buttons - remote
 |
View all Epson PowerLite 715c manuals
Add to My Manuals
Save this manual to your list of manuals |
Page 8 highlights
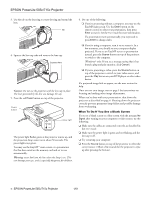
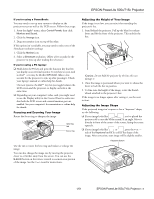
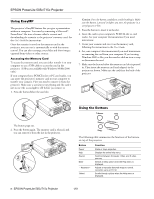
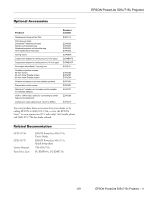
EPSON PowerLite 505c/715c Projector Using EasyMP The projector's EasyMP feature lets you give a presentation without a computer. You start by converting a Microsoft® PowerPoint® file into a format called a scenario and downloading the scenario to the projector's memory card. See the User's Guide for instructions. Once the scenario is saved on the memory card in the projector, you can run it automatically or with the remote control. You can also rearrange your slides and show images captured from videos or other sources. Accessing the Memory Card To access the memory card, you can either transfer it to your computer or use a USB cable to access the card in the projector. (USB access available with Windows 98/Me/2000 only.) If your computer has a PCMCIA slot or PC card reader, you can insert the projector's memory card in your computer to transfer your scenario. First you need to remove it from the projector. Make sure a scenario is not playing and the card is not in use (the access light is off) before you remove it. 1. Press the button below the card slot. Caution: Press the button carefully to avoid breaking it. Make sure the button is pressed in before you store the projector in a carrying case or box. 3. Press the button to insert it in the slot. 4. Insert the card in your computer's PCMCIA slot or card reader. See your computer documentation if you need instructions. 5. Create your scenario and save it on the memory card, following the instructions in the User's Guide. 6. See your computer's documentation if you need instructions on removing the card from your computer. If you're using Windows 2000 or Me, you first need to click an icon to stop or disconnect the card. 7. Make sure the button below the memory card slot is pressed in. Then insert the memory card (and adapter) in the projector as shown. Make sure the card faces the back of the projector. The button pops out. 2. Press the button again. The memory card is released, and you can remove it from the slot in the projector. Using the Buttons Power Help Source Keystone Enter Select The following table summarizes the functions of the buttons on top of the projector: Button Power Help Source Enter - Keystone + Select Function Starts or stops projection. Displays the online help menu. Switches between Computer, Video, and S-video sources. Selects a menu option when the Help menu is displayed. Adjusts a trapezoid distorted image to normal, correction up to a ±15° tilt. Scrolls through options when the Help menu is displayed. 8 - EPSON PowerLite 505c/715c Projector 1/01
-
 1
1 -
2
-
 3
3 -
 4
4 -
 5
5 -
 6
6 -
 7
7 -
 8
8 -
 9
9 -
 10
10 -
 11
11 -
 12
12
 |
 |