Epson PowerLite 715c Quick Start - Page 1
Epson PowerLite 715c Manual
 |
View all Epson PowerLite 715c manuals
Add to My Manuals
Save this manual to your list of manuals |
Page 1 highlights
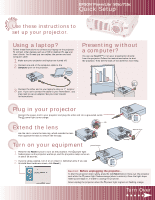
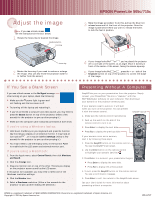
TART S EPSON® PowerLite® 505c/715c Quick Setup HERE Use these instructions to set up your projector. Using a laptop? Follow these instructions to connect your laptop to the projector. To connect other devices, such as a VCR or desktop PC, see your User's Guide. You'll need just two cables: the power cord and computer cable. 1 Make sure your projector and laptop are turned off. 2 Connect one end of the computer cable to the Computer port on the projector. Presenting without a computer? You can use EasyMP™ to run your presentation directly from the projector. Follow the instructions below to start the projector. Then see the back of this sheet for more help. 3 Connect the other end to your laptop's video or monitor port. If you can't connect the cable to your PowerBook®, you may need to use an adapter. See your User's Guide for instructions. Plug in your projector Connect the power cord to your projector and plug the other end into a grounded outlet. The power light turns orange. tab Extend the lens Use the tab to rotate the lens ring, which extends the lens. Then squeeze the tabs to remove the lens cap. Turn on your equipment power button 1 Press the red Power button to turn on the projector. The power light flashes green as the projector warms up, and the projection lamp comes on in about 30 seconds. 2 If you're using a laptop, turn it on or restart it. (Windows only: If you see this Add New Hardware screen, click Cancel.) squeeze here lens cap Caution: Before unplugging the projector... To shut the projector down safely, press the red Power button twice. Let the projector cool while the power light flashes orange (about a minute). Once the light stops flashing and stays on, it's safe to unplug the projector. Never unplug the projector when the power light is green or flashing orange. Turn Over
-
 1
1 -
 2
2
 |
 |
