Epson PowerLite 7550c User Manual - Page 73
Buttons on for details., To cancel a function, press the bottom multi-purpose button twice.
 |
View all Epson PowerLite 7550c manuals
Add to My Manuals
Save this manual to your list of manuals |
Page 73 highlights
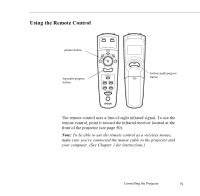
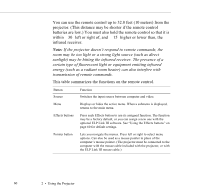
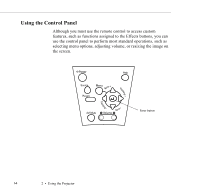
screen). Each button is assigned a function in the factory. You can use the Effect menu to modify the appearance and behavior of these functions. (See "Modifying the Special Effects" on page 81.) If you have the optional ELP Link III software, you can assign different functions to each button, or you can program buttons with your own functions. (See "Assigning Functions to the Effects Buttons" on page 102 for details.) To cancel a function, press the bottom multi-purpose button twice. To repeat a function, move the pointer to a new location and repeat the process. The following table summarizes the default assignments. Button 1 Function Pointer Description Displays the pointer as a three-dimensional arrow (or other user-defined shape) rather than a flat black arrow. 2 Box Draws a box on the screen: Press the Effects button, then press the bottom multi-purpose button once to define the position of one corner. Use the pointer button to move the pointer. Then press the bottom multipurpose button again to define the position of the opposite corner of the box. 62 2 • Using the Projector
-
 1
1 -
2
-
3
-
4
-
5
-
6
-
7
-
8
-
9
-
10
-
11
-
12
-
13
-
14
-
15
-
16
-
17
-
18
-
19
-
20
-
21
-
22
-
23
-
24
-
25
-
26
-
27
-
28
-
29
-
30
-
31
-
32
-
33
-
34
-
35
-
36
-
37
-
38
-
39
-
40
-
41
-
42
-
43
-
44
-
45
-
46
-
47
-
48
-
49
-
50
-
51
-
52
-
53
-
54
-
55
-
56
-
57
-
58
-
59
-
60
-
61
-
62
-
63
-
64
-
65
-
66
-
67
-
 68
68 -
 69
69 -
 70
70 -
 71
71 -
 72
72 -
 73
73 -
 74
74 -
 75
75 -
 76
76 -
 77
77 -
 78
78 -
79
-
80
-
81
-
82
-
83
-
84
-
85
-
86
-
87
-
88
-
89
-
90
-
91
-
92
-
93
-
94
-
95
-
96
-
97
-
98
-
99
-
100
-
101
-
102
-
103
-
104
-
105
-
106
-
107
-
108
-
109
-
110
-
111
-
112
-
113
-
114
-
115
-
116
-
117
-
118
-
119
-
120
-
121
-
122
-
123
-
124
-
125
-
126
-
127
-
128
-
129
-
130
-
131
-
132
-
133
-
134
-
135
-
136
-
137
-
138
-
139
-
140
-
141
-
142
-
143
-
144
-
145
-
146
-
147
-
148
-
149
-
150
-
151
-
152
-
153
-
154
-
155
-
156
-
157
-
158
-
159
-
160
-
161
-
162
-
163
-
164
-
165
-
166
-
167
-
168
-
169
-
170
-
171
-
172
-
173
-
174
-
175
-
176
-
177
-
178
 |
 |