Epson PowerLite 765c User's Guide - Page 77
Once the connection is established, you see your computer's
 |
View all Epson PowerLite 765c manuals
Add to My Manuals
Save this manual to your list of manuals |
Page 77 highlights
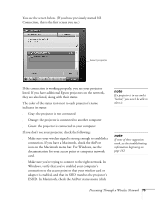
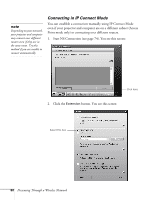
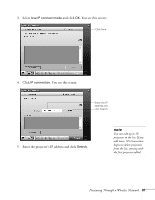
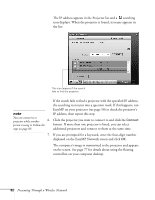
4. Once the name of your projector appears, select it and click Connect. If more than one projector is listed, you can select additional ones and connect to them at the same time. If the selected projector is already being used by another person, you can still connect to it (unless it is "locked"); doing so automatically disconnects the other user. If a projector is locked, you won't be able to connect to it when it is in use. 5. If you set up the projector to prompt you for a keyword before connecting, you see a screen like this one: note If you want your presentation encrypted, click Extension and select Use encrypted communication. This step enhances security but decreases the data transmission speed. Enter keyword Type in the four-digit number displayed on the EasyMP Network screen and click OK. 6. Once the connection is established, you see your computer's image transmitted to the screen, and a floating control bar on your computer desktop: Windows Macintosh 7. If necessary, you can drag the control bar out of the way on your screen. 8. When you're done with your presentation, click Disconnect on the control bar. Presenting Through a Wireless Network 77
-
 1
1 -
2
-
3
-
4
-
5
-
6
-
7
-
8
-
9
-
10
-
11
-
12
-
13
-
14
-
15
-
16
-
17
-
18
-
19
-
20
-
21
-
22
-
23
-
24
-
25
-
26
-
27
-
28
-
29
-
30
-
31
-
32
-
33
-
34
-
35
-
36
-
37
-
38
-
39
-
40
-
41
-
42
-
43
-
44
-
45
-
46
-
47
-
48
-
49
-
50
-
51
-
52
-
53
-
54
-
55
-
56
-
57
-
58
-
59
-
60
-
61
-
62
-
63
-
64
-
65
-
66
-
67
-
68
-
69
-
70
-
71
-
 72
72 -
 73
73 -
 74
74 -
 75
75 -
 76
76 -
 77
77 -
 78
78 -
 79
79 -
 80
80 -
 81
81 -
 82
82 -
83
-
84
-
85
-
86
-
87
-
88
-
89
-
90
-
91
-
92
-
93
-
94
-
95
-
96
-
97
-
98
-
99
-
100
-
101
-
102
-
103
-
104
-
105
-
106
-
107
-
108
-
109
-
110
-
111
-
112
-
113
-
114
-
115
-
116
-
117
-
118
-
119
-
120
-
121
-
122
-
123
-
124
-
125
-
126
-
127
-
128
-
129
-
130
-
131
-
132
-
133
-
134
-
135
-
136
-
137
-
138
-
139
-
140
-
141
-
142
-
143
-
144
-
145
-
146
-
147
-
148
-
149
-
150
-
151
-
152
-
153
-
154
-
155
-
156
-
157
-
158
-
159
-
160
-
161
-
162
-
163
-
164
-
165
-
166
-
167
-
168
-
169
-
170
-
171
-
172
-
173
-
174
-
175
-
176
-
177
-
178
-
179
-
180
-
181
-
182
-
183
-
184
-
185
-
186
-
187
-
188
-
189
-
190
-
191
-
192
-
193
-
194
-
195
-
196
-
197
-
198
 |
 |
