Epson PowerLite 83 User's Guide - Page 97
Registering a Projector, Monitoring Your Projector, Open EMP Monitor.
 |
UPC - 010343868175
View all Epson PowerLite 83 manuals
Add to My Manuals
Save this manual to your list of manuals |
Page 97 highlights
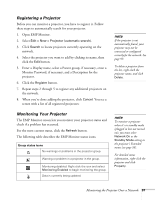
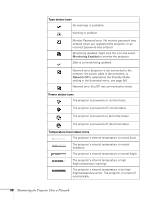
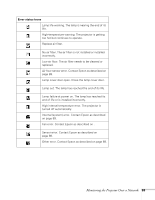
Registering a Projector Before you can monitor a projector, you have to register it. Follow these steps to automatically search for your projector. 1. Open EMP Monitor. 2. Select Edit > New > Projector (automatic search). 3. Click Search to locate projectors currently operating on the network. 4. Select the projector you want to add by clicking its name, then click the Edit button. 5. Enter a Display name, select a Parent group, if necessary, enter a Monitor Password, if necessary, and a Description for the projector. 6. Click the Register button. 7. Repeat steps 2 through 5 to register any additional projectors on the network. 8. When you're done adding the projector, click Cancel. You see a screen with a list of all registered projectors: note If the projector is not automatically found, your projector may not be connected or configured correctly for the network. See page 93. To delete a projector from the list, right-click the projector name, and click Delete. Monitoring Your Projector The EMP Monitor screen lets you monitor your projector status and check if a problem has occurred. For the most current status, click the Refresh button. The following table describes the EMP Monitor status icons. Group status icons No warnings or problems in the projector group. Warning or problem in a projector in the group. Monitoring disabled. Right click the icon and select Monitoring Enabled to begin monitoring the group. Data is currently being updated. note To monitor a projector when it's in standby mode (plugged in but not turned on), you must select Network On as the Standby Mode setting in the projector's Extended menu (see page 58). For detailed status information, right-click the projector and click Property. Monitoring the Projector Over a Network 97
-
 1
1 -
2
-
3
-
4
-
5
-
6
-
7
-
8
-
9
-
10
-
11
-
12
-
13
-
14
-
15
-
16
-
17
-
18
-
19
-
20
-
21
-
22
-
23
-
24
-
25
-
26
-
27
-
28
-
29
-
30
-
31
-
32
-
33
-
34
-
35
-
36
-
37
-
38
-
39
-
40
-
41
-
42
-
43
-
44
-
45
-
46
-
47
-
48
-
49
-
50
-
51
-
52
-
53
-
54
-
55
-
56
-
57
-
58
-
59
-
60
-
61
-
62
-
63
-
64
-
65
-
66
-
67
-
68
-
69
-
70
-
71
-
72
-
73
-
74
-
75
-
76
-
77
-
78
-
79
-
80
-
81
-
82
-
83
-
84
-
85
-
86
-
87
-
88
-
89
-
90
-
91
-
 92
92 -
 93
93 -
 94
94 -
 95
95 -
 96
96 -
 97
97 -
 98
98 -
 99
99 -
 100
100 -
 101
101 -
 102
102 -
103
-
104
-
105
-
106
-
107
-
108
-
109
-
110
-
111
-
112
-
113
-
114
-
115
-
116
-
117
-
118
-
119
-
120
 |
 |