Epson PowerLite Home Cinema 8345 Canada Only Operation Guide - EasyMP Network - Page 10
Preparing to Connect
 |
View all Epson PowerLite Home Cinema 8345 Canada Only manuals
Add to My Manuals
Save this manual to your list of manuals |
Page 10 highlights
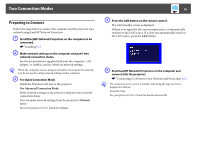
Two Connection Modes 10 Preparing to Connect Follow the steps below to connect the computer and the projector via a network using EasyMP Network Projection. A Install EasyMP Network Projection on the computer to be connected. s "Installing" p.7 B Make network settings on the computer and put it into network connection status. See the documentation supplied with your the computer, LAN adapter, or AirMac card for details on network settings. q When the computer you are using is normally connected to the network, you do not need to make network settings on the computer. C For Quick Connection Mode Install the Wireless LAN unit to the projector. For Advanced Connection Mode Make network settings on the projector and put it into network connection status. You can make network settings from the projector's Network menu. See your projector User's Guide for details. D Press the LAN button on the remote control. The LAN standby screen is displayed. If there is no signal for the current input source, it automatically switches to the LAN source. If it does not automatically switch to the LAN source, press the LAN button. E Start EasyMP Network Projection on the computer and connect with the projector. s "Connecting to a Projector on a Network and Projecting" p.11 q If a connection error occurs, a number indicating the type of error is displayed as follows. Event ID: 04xx See your projector User's Guide for details on Event ID.
-
 1
1 -
2
-
3
-
4
-
 5
5 -
 6
6 -
 7
7 -
 8
8 -
 9
9 -
 10
10 -
 11
11 -
 12
12 -
 13
13 -
 14
14 -
 15
15 -
16
-
17
-
18
-
19
-
20
-
21
-
22
-
23
-
24
-
25
-
26
-
27
-
28
-
29
-
30
-
31
-
32
-
33
-
34
-
35
-
36
-
37
-
38
-
39
-
40
-
41
-
42
-
43
-
44
-
45
-
46
-
47
-
48
-
49
-
50
 |
 |
