Epson R340 Quick Reference Guide - Page 3
Customizing Your Prints, Paper Type Setting - manual
 |
UPC - 010343855632
View all Epson R340 manuals
Add to My Manuals
Save this manual to your list of manuals |
Page 3 highlights
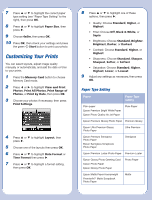
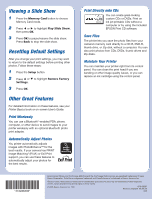
7 Press or to highlight the correct paper type setting (see "Paper Type Setting" to the right), then press OK. 8 Press or to highlight Paper Size, then press . 9 Choose 4x6in, then press OK. 10 Press OK, then check your settings and press the green Start button to print your photo. Customizing Your Prints You can select layouts, adjust image quality manually or automatically, and add the date or time to your prints. 1 Press the Memory Card button to choose Memory Card mode. 2 Press or to highlight View and Print Photos, Print All Photos, Print Range of Photos, or Print by Date, then press OK. 3 Choose your photos if necessary, then press Print Settings. 4 Press or to highlight Layout, then press . 5 Choose one of the layouts then press OK. 6 Press or to highlight Date Format or Time Format then press . 7 Press or to highlight a format setting, then press OK. 8 Press or to highlight one of these options, then press : • Quality: Choose Standard, Higher, or Highest • Filter: Choose Off, Black & White, or Sepia • Brightness: Choose Standard, Brighter, Brightest, Darker, or Darkest • Contrast: Choose Standard, Higher, or Highest • Sharpness: Choose Standard, Sharper, Sharpest, Softer, or Softest • Saturation: Choose Standard, Higher, Highest, Lower, or Lowest 9 Adjust any settings as necessary, then press OK. Paper Type Setting Paper Paper Type setting Plain paper Epson Premium Bright White Paper Epson Photo Quality Ink Jet Paper Plain Paper Epson Premium Glossy Photo Paper Premium Glossy Epson Ultra Premium Glossy Photo Paper Ultra Premium Epson Premium Semigloss Photo Paper Epson Semigloss Scrapbook Photo Paper Semigloss Epson Premium Luster Photo Paper Premium Luster Epson Glossy Photo Greeting Card Epson Photo Paper Epson Glossy Photo Paper Photo Paper Epson Matte Paper Heavyweight PremierArtTM Matte Scrapbook Photo Paper Matte
-
 1
1 -
 2
2 -
 3
3 -
 4
4
 |
 |