Epson RX500 Start Here Card - Page 3
Unlock the Printer, Plug In and Turn On, Install Ink Cartridges
 |
UPC - 010343848467
View all Epson RX500 manuals
Add to My Manuals
Save this manual to your list of manuals |
Page 3 highlights
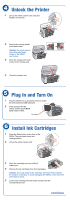
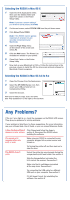
4 Unlock the Printer 1 Lift up the entire scanner unit using the handles on the side. 2 Remove the orange plastic print head holder. Caution: You must remove the orange print head holder or the RX500 won't work. 3 Store the orange print head holder in the storage area. 4 Close the scanner unit. 5 Plug In and Turn On 1 Plug the RX500 into a grounded electrical outlet. Do not connect a USB cable yet. 2 Press and hold the On button until the green Mode lights begin to flash. On button 6 Install Ink Cartridges 1 Press the Color button on the front of the RX500. The print head moves into loading position. 2 Lift up the entire scanner unit. 3 Open the cartridge cover by pulling it toward you. 4 Remove the ink cartridges from their packages. Caution: You must install all the cartridges and leave them installed for all types of printing. To avoid damaging the RX500, never move the print head by hand. 5 Lower each cartridge into the holder marked with the corresponding color. continue
-
 1
1 -
 2
2 -
 3
3 -
 4
4 -
 5
5 -
 6
6 -
 7
7 -
 8
8
 |
 |
