Epson Stylus 300 User Manual - Page 4
Notice, Note: You do not need, do these additional steps when you, the ink
 |
View all Epson Stylus 300 manuals
Add to My Manuals
Save this manual to your list of manuals |
Page 4 highlights
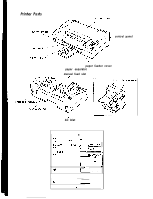
Notice When you install the ink cartridge for the first time (just after unpacking the printer), please perform the following steps in addition to the steps described in your user's guide. After step 4 on page l-10 (after you hold down the REPLACE INK button and the carriage moves to the middle of the printer) do the following: Turn the paper-thickness lever clockwise as far as it will go, as shown below. Next go on to the next step (step 5 on page l-10). Proceed with steps as written in the manual until you reach step 11. After the printer finishes the cleaning procedure in step 11 on page 1-13, perform the following additional steps: Hold down the REPLACE INK button until the carriage moves to the middle position. Turn the paper-thickness lever all the way to the left (counterclockwise). Press the REPLACE INK button again to return the carriage to the far right position. Go on to the next step (step 12 on page 1-13). Note: You do not need to do these additional steps when you rephce the ink autridgc. Copyright 0 1993 by Seiko Epson Corp.
-
 1
1 -
 2
2 -
 3
3 -
 4
4 -
 5
5 -
 6
6 -
 7
7 -
 8
8 -
 9
9 -
 10
10 -
11
-
12
-
13
-
14
-
15
-
16
-
17
-
18
-
19
-
20
-
21
-
22
-
23
-
24
-
25
-
26
-
27
-
28
-
29
-
30
-
31
-
32
-
33
-
34
-
35
-
36
-
37
-
38
-
39
-
40
-
41
-
42
-
43
-
44
-
45
-
46
-
47
-
48
-
49
-
50
-
51
-
52
-
53
-
54
-
55
-
56
-
57
-
58
-
59
-
60
-
61
-
62
-
63
-
64
-
65
-
66
-
67
-
68
-
69
-
70
-
71
-
72
-
73
-
74
-
75
-
76
-
77
-
78
-
79
-
80
-
81
-
82
-
83
-
84
-
85
-
86
-
87
-
88
-
89
-
90
-
91
-
92
-
93
-
94
-
95
-
96
-
97
-
98
-
99
-
100
-
101
-
102
-
103
-
104
-
105
 |
 |
