Epson Stylus C40S Start Here Card - Page 1
Epson Stylus C40S - Ink Jet Printer Manual
 |
View all Epson Stylus C40S manuals
Add to My Manuals
Save this manual to your list of manuals |
Page 1 highlights
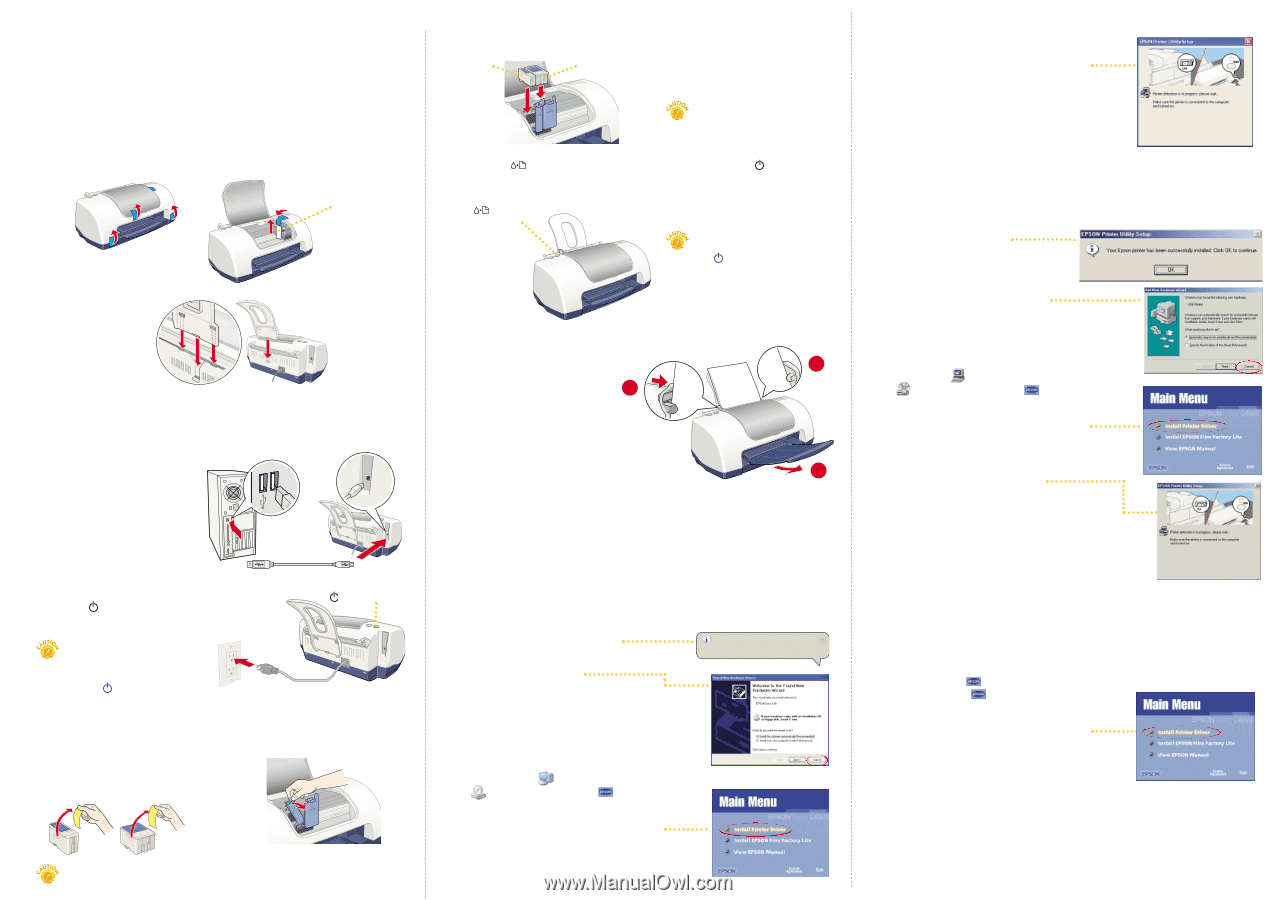
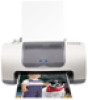
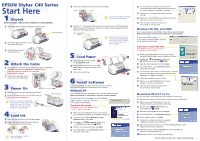
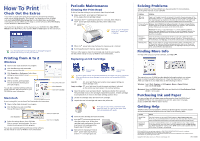
ESSPtStaOaNrtrSttHylueHs®rCee4r0 eSeries 11 Unpack Before you begin, make sure your computer is set up completely. 1 Remove the tape and packing material from the printer. remove the insert 2 Peel off the tape beneath the cover and remove the insert. 3 Insert the paper support into its three slots. 22Attach the Cable 1 Shut down your computer before attaching the cable. In Windows®, click Start and select your Shut Down or Turn Off option. Leave the computer turned off until instructed to turn it on in section 6. 2 Connect your USB cable to the printer and a PC or Macintosh®. 33Power On 1 Plug the printer into a grounded electrical outlet. 2 Press the power button until the lights come on. Don't turn on the computer yet. Don't use an outlet controlled by a wall switch or timer. Never use a power strip switch to turn the printer on or off; use only the printer's power button. 44Load Ink 1 Open the cover and lift the ink cartridge clamps. 2 Unpack the ink cartridges that came with your printer and remove the yellow tape. power button Keep cartridges out of the reach of children. 3 Insert both cartridges as shown and close the clamps. black color You must install both cartridges or the printer won't work. 4 Press the maintenance button and close the printer cover. The power light flashes and you hear the printer charge its ink. Wait until ink charging is finished (the power light stops flashing). maintenance button Don't turn off the printer or interrupt ink charging while the power light is flashing or you'll use up more ink than necessary. 55Load Paper 1 Load some paper behind the tab 2 on the right edge guide. 2 Press in the locking tab on the left edge 1 guide and slide it against the edge of the paper stack. 3 Pull out the output tray. 3 66Install Software If you're using Windows, check to see which version you have, then follow the right set of instructions for your system. Windows XP Your computer may have the EPSON® printer software already installed. Make sure the printer is still turned on, then turn on your computer. If you see this message in the bottom right corner of your screen You're ready to start printing! Found New Hardware Your new hardware is installed and ready to use. If you see this screen Click Cancel. Then follow the steps below to install the printer software: 1 When you see the Windows icons on your monitor, put the EPSON CD-ROM in your CD-ROM or DVD drive. 2 If you see a screen asking What do you want Windows to do?, click Cancel. 3 Click Start, click My Computer, double-click EPSON, then double-click EPSON. 4 Read the license agreement and click Agree. 5 At the Main Menu, click Install Printer Driver. The printer files install. 6 If you see this screen, make sure the printer is connected and turned on. Wait a few moments until the screen disappears. Click Retry if necessary. 7 When you see a message that setup is complete, click OK. 8 When you see the EPSON Product Registration screen, register your printer as instructed. 9 Close any open windows on your screen. You're ready to start printing! Windows 98, Me, and 2000 Your computer may have the EPSON printer software already installed. Make sure the printer is still turned on, then turn on your computer. If you see this screen Your software is already installed. Click OK. You're ready to start printing! If you see a screen like this Click Cancel. Then follow the steps below to install the printer software: 1 When you see the Windows icons on your monitor, put the EPSON CD-ROM in your CD-ROM or DVD drive. 2 Double-click My Computer, double-click EPSON, then double-click EPSON. 3 Read the license agreement and click Agree. 4 At the Main Menu, click Install Printer Driver. The printer files install. 5 If you see this screen, make sure the printer is turned on and connected. Wait a few moments until the screen disappears. Click Retry if necessary. 6 At the last installation screen, click OK. 7 When you see the EPSON Registration screen, register your printer as instructed. 8 Close any open windows on your screen. You're ready to start printing! Macintosh OS 8.5.1 to 9.x If you're using OS X, see the Read This First booklet for instructions. 1 Make sure your printer is still turned on, then turn on your Macintosh. 2 When you see your Macintosh icons, put the EPSON CD-ROM in your CD-ROM or DVD drive. 3 Double-click the EPSON CD-ROM icon, then double-click EPSON. 4 Read the license agreement and click Agree. 5 At the Main Menu, click Install Printer Driver. 6 At the installer screen, click Install. 7 Follow the on-screen instructions to complete installation and restart your Macintosh. 8 After your Macintosh restarts, you see the EPSON Registration screen. Register your printer as instructed. 9 Open the Chooser, click the C40 Series icon, click your USB port, and turn on background printing. 10 Close the Chooser. You're ready to start printing! Turn this over to start printing . . .
-
 1
1 -
 2
2
 |
 |