Epson Stylus Photo R3000 Start Here - Page 3
Choose your connection, Install software, Any questions?, NOT CONNECTED, Cancel, Run Setup.exe. - wireless
 |
View all Epson Stylus Photo R3000 manuals
Add to My Manuals
Save this manual to your list of manuals |
Page 3 highlights
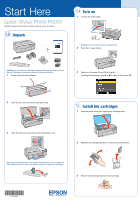
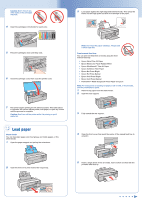
6 Feed the paper up to the line on the tray. Make sure the paper is flush against the right. 6 Install software 1 Make sure the printer is NOT CONNECTED to your computer. 7 Press the OK button. The paper loads inside the printer. 8 When you see a message on the screen, close the manual feed tray. Push it in until it latches. 9 Extend the output tray. Windows®: If you see a Found New Hardware screen, click Cancel and disconnect the USB cable. You can't install your software that way. 2 Insert your product CD. Windows: If you see the AutoPlay window, click Run Setup.exe. If you see the User Account Control screen, click Yes or Continue. Macintosh®: Double-click the Epson icon. 3 Windows: Click Install and follow the on-screen instructions. Macintosh: Select the items you want to install, then click Install. 5 Choose your connection You can connect your printer to your existing network (wireless or wired) or directly to your computer using a USB cable (not included). See below for details on each connection method. Wireless Connection (802.11n) You must install the software on every computer from which you want to print. For the first installation, we recommend using a USB cable (not included) to simplify wireless setup. After the printer is connected to the network, you will be prompted to remove the cable. If you're using Mac OS® X 10.6 or don't have a USB cable, you will need to use the control panel on the printer to select wireless settings. Make sure you know your network name (SSID) and network password: • Network name • Network password If you don't have this information, contact the person who set up your network. Note: For optimal print speed, your wireless router and/or laptop must conform to the 802.11n standard. Earlier standards (802.11a/b/g) are not supported. Direct USB Connection Make sure you have a USB cable (not included). Do not connect the printer to your computer until you're instructed to do so. Wired Ethernet® Connection Make sure you have an Ethernet network cable (not included). You must install the software on every computer from which you want to print. Tip: Be sure to install the professional print samples. When you're done with the installation, you can test your printer's output in both color and black-and-white. Any questions? Network Setup Follow the on-screen instructions when you insert your product CD. If you need additional help, see the printed Basics guide. You can also watch a video tutorial at: epson.com/support/wireless. Basics Guide Basic instructions for loading paper, printing, maintenance, and network setup. On-screen help with your software Select Help or ? when you're using your software. User's Guide Click the shortcut on your desktop (or in the Applications/Epson Software/ Guide folder on Macintosh) to access the online User's Guide, software downloads, Epson Supplies CentralSM, and more (requires an Internet connection).
-
 1
1 -
 2
2 -
 3
3 -
 4
4
 |
 |
