Epson Stylus Pro 3880 Graphic Arts Edition User's Guide - Page 84
without borders. If too much of your image's edges are cut off,
 |
View all Epson Stylus Pro 3880 Graphic Arts Edition manuals
Add to My Manuals
Save this manual to your list of manuals |
Page 84 highlights
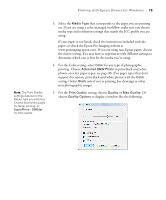
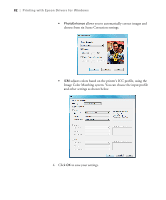
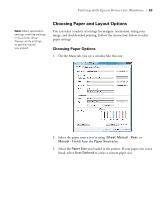
84 | Printing with Epson Drivers for Windows You see a window like this one: Note: If your application has margin settings, make sure they're turned off for borderless printing. Borderless printing takes longer than normal printing. Borderless printing is not available when using the front manual feed slot. Type a name for your custom size, then enter the size in hundredths of an inch (or centimeters) and click Save, then click OK. 4. If you want to print to the edges of the page, click Borderless. Click the Expansion button, then choose one of the following: • Auto Expand enlarges your image up to 3% to fit the size paper without borders. If too much of your image's edges are cut off, you can adjust the expansion slider to choose Min, Mid, or Max. The Min setting retains the entire image in your print, but there may be a small white border on the edges of the print. The Max setting expands the image to ensure that there are no unprinted edges, but the edges of the image may be cropped. 4-84
-
 1
1 -
2
-
3
-
4
-
5
-
6
-
7
-
8
-
9
-
10
-
11
-
12
-
13
-
14
-
15
-
16
-
17
-
18
-
19
-
20
-
21
-
22
-
23
-
24
-
25
-
26
-
27
-
28
-
29
-
30
-
31
-
32
-
33
-
34
-
35
-
36
-
37
-
38
-
39
-
40
-
41
-
42
-
43
-
44
-
45
-
46
-
47
-
48
-
49
-
50
-
51
-
52
-
53
-
54
-
55
-
56
-
57
-
58
-
59
-
60
-
61
-
62
-
63
-
64
-
65
-
66
-
67
-
68
-
69
-
70
-
71
-
72
-
73
-
74
-
75
-
76
-
77
-
78
-
 79
79 -
 80
80 -
 81
81 -
 82
82 -
 83
83 -
 84
84 -
 85
85 -
 86
86 -
 87
87 -
 88
88 -
 89
89 -
90
-
91
-
92
-
93
-
94
-
95
-
96
-
97
-
98
-
99
-
100
-
101
-
102
-
103
-
104
-
105
-
106
-
107
-
108
-
109
-
110
-
111
-
112
-
113
-
114
-
115
-
116
-
117
-
118
-
119
-
120
-
121
-
122
-
123
-
124
-
125
-
126
-
127
-
128
-
129
-
130
-
131
-
132
-
133
-
134
-
135
-
136
-
137
-
138
-
139
-
140
-
141
-
142
-
143
-
144
-
145
-
146
-
147
-
148
-
149
-
150
-
151
-
152
-
153
-
154
 |
 |
