Epson Stylus Scan 2000 Quick Start - Page 2
Load paper, Test your EPSON Stylus Scan, CAUTION - ink
 |
View all Epson Stylus Scan 2000 manuals
Add to My Manuals
Save this manual to your list of manuals |
Page 2 highlights
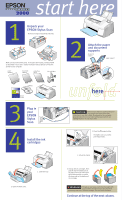
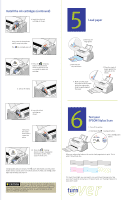
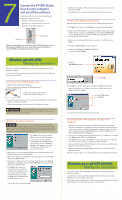
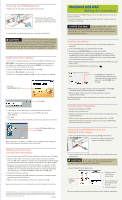
Install the ink cartridges (continued) 6.Insert the color ink cartridge as shown. Then press the clamp down until it snaps into place. The ink out light goes off. 7. Press the cleaning button. The print head moves to the left so you can install the black ink cartridge. 8. Lift up the clamp. 5 Load paper 1. Slide out the edge guide. 2. Slide out the tray extensions. 4. Make sure the paper fits under the arrow mark inside the edge guide. Slide the guide against the paper. 3. Place the stack of paper against the right side of the feeder. 9. Insert the black cartridge as shown. Then press the clamp down until it snaps into place. 6 Test your EPSON Stylus Scan 1. Turn off the printer. 2. Hold down the load/eject button. 3. Press the power button. 10. Press the cleaning button to begin charging the ink delivery system. Then close the front cover. When you release the buttons, the nozzle check page starts to print. This is what it should look like: Charging takes about 2 minutes. The power light flashes and the printer makes various sounds. Don't turn off the printer yet. Wait until the power light stops flashing and stays on. CAUTION Don't open the clamps to remove a cartridge except to replace it with a new one. Once you remove a cartridge, you can't reuse it, even if it contains ink. You must install both cartridges and leave them installed for all types of printing. To avoid damaging the printer, never move the print head by hand. If it doesn't look right, you may need to run a print head cleaning cycle. See your User's Guide for instructions. If it doesn't print, see "Solving Problems" in your User's Guide. tournver É
-
 1
1 -
 2
2 -
 3
3 -
 4
4
 |
 |
