Epson Stylus Scan 2000 Quick Start - Page 3
Connect the EPSON Stylus Scan to your computer and install the software, Windows 98 with USB - driver
 |
View all Epson Stylus Scan 2000 manuals
Add to My Manuals
Save this manual to your list of manuals |
Page 3 highlights
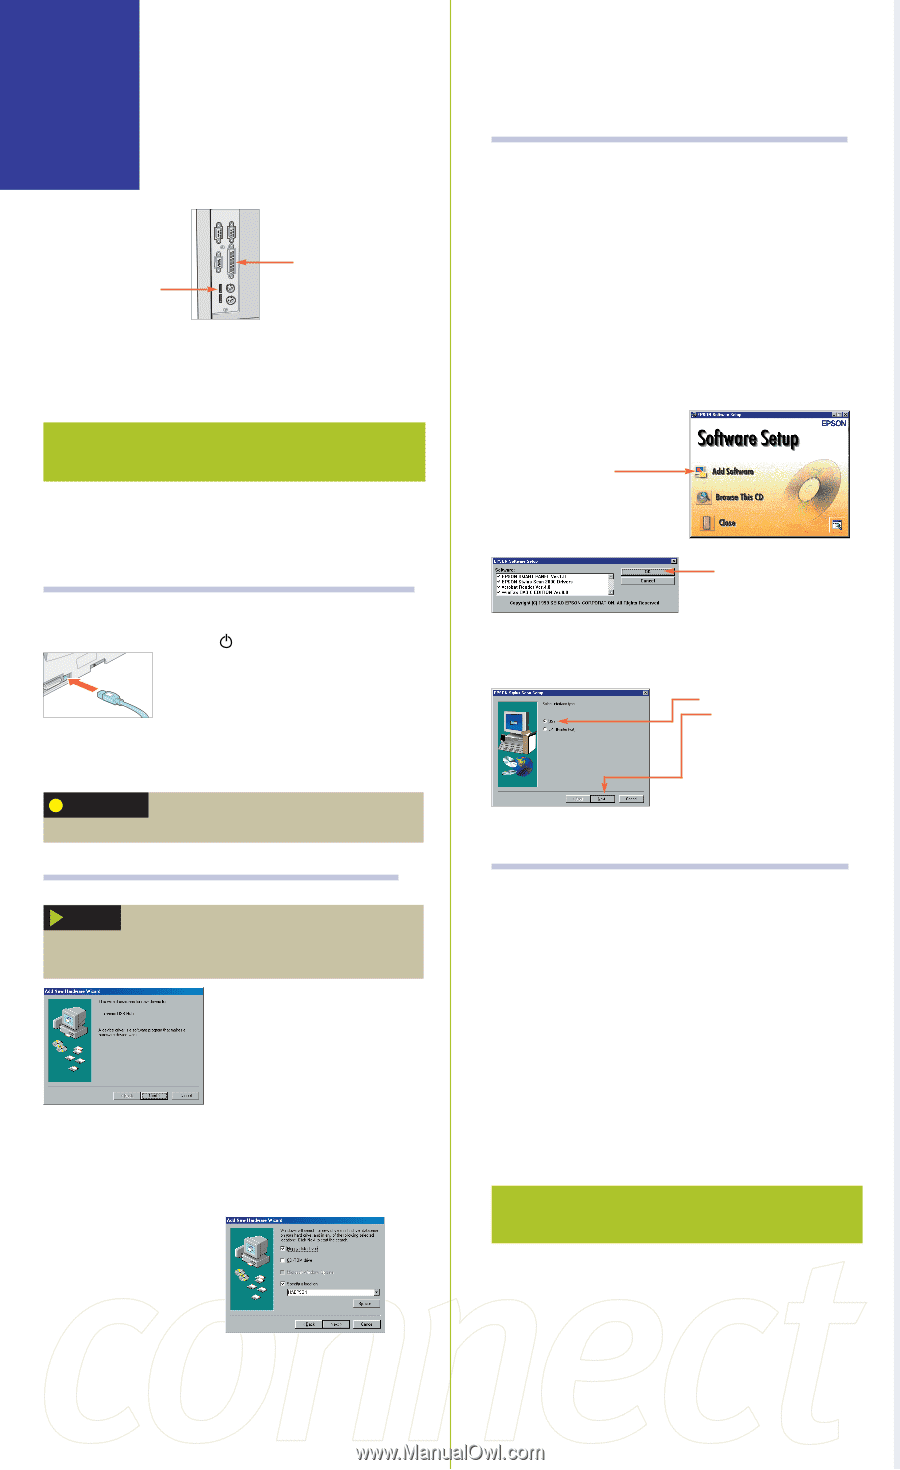
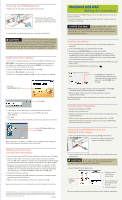
7 Connect the EPSON Stylus Scan to your computer and install the software You'll follow different instructions, depending on what type of system you have: s Windows® 98 with USB Connection s Windows 95 or 98 with Parallel Connection s Macintosh® with USB Connection USB port Parallel port Before you start, make sure you have the two CD-ROMs that came in the box with your EPSON Stylus Scan. If you don't have a CD-ROM drive. Contact EPSON as described in your User's Guide. Windows 98 with USB: Making the connection First you'll connect the EPSON Stylus Scan to your computer, then you'll install the software. To connect the printer, you'll need a shielded USB "AB" interface cable, not more than 6.5 feet long. Connecting Your EPSON Stylus Scan 1. Make sure your computer is turned on. 2. Turn on the printer by pressing the power button. 3. Connect the square end of the USB cable to your printer's USB port. 4. Connect the flat end of the cable to your computer's USB port or USB hub port. Windows detects your printer. 5. Follow the instructions in the next section to install your software. CAUTION If you're using a USB hub, connect the printer to a first tier hub. If the printer doesn't work with the hub, connect it directly to a USB port on your computer. Installing Your Driver Software NOTE Make sure you have your Microsoft® Windows 98 CD-ROM available. If you don't have this CD-ROM, make sure you know where to find the Windows 98 driver files on your hard disk (for example, in the Win 98 folder.) If you need help, contact your computer manufacturer. Don't click Cancel at any time during the installation process. 1. Click Next, then continue clicking Next on each window that appears. 2. If you see a message asking for your Windows 98 CD-ROM, insert it and click OK. (Or select Specify a location, click Browse, and locate the Windows 98 driver files on your hard disk drive.) 3. When you see the message that Windows has finished installing, click Finish. Windows detects a USB printer. 4. Remove the Windows 98 CD-ROM (if necessary) and insert the EPSON Stylus Scan 2000 CD-ROM. 5. Repeat step 1. When you see the window shown below, select Specify a location, click Browse, and locate the \EPSON folder on your EPSON Stylus Scan 2000 CD-ROM. 6. Click Next, then follow the instructions on the screen to complete the installation. You may need to switch between the EPSON Stylus Scan 2000 CD-ROM and your Windows 98 CD-ROM several times. You see the Screen Calibration utility. 7. Move the slider right or left until the stripes match as closely as possible. Then click OK. 8. Click Finish. Then continue with the instructions in the next section. Finishing the Software Installation Windows detects the scanner portion of your EPSON Stylus Scan 2000. 1. Click Next, then continue clicking Next on each window that appears. 2. Make sure the EPSON Stylus Scan 2000 CD-ROM is in your drive. If you need to specify a location, click Browse, and locate the \EPSON folder on your EPSON Stylus Scan 2000 CD-ROM. Then click Next and follow the instructions on the screen. 3. When you see a message that Setup is complete, click OK, then click Finish. 4. Double-click My Computer on your desktop. 5. Double-click the Epson_ss2000 CD-ROM icon. Then double-click Cdsetup. 6. Click the Add Software button. 7. Click OK. 8. Follow the on-screen instructions to install the EPSON Smart Panel. When the installation is complete, you see the EPSON Stylus Scan Setup window. Click Next. 9. Select USB, then... click Next. Continue with the instructions in the next section. Installing Adobe® PhotoDeluxe® and Additional Software 1. Follow the on-screen instructions to install Acrobat® Reader and WinFax®. After each installation is complete, the next one begins automatically. Don't restart your computer until all the programs have been installed. You may need to switch between the EPSON Stylus Scan 2000 CD-ROM and your Microsoft Windows 98 CD-ROM again. 2. If you see a message requesting a disk labeled 'DLL. Installations,' click OK, click Browse, click OK, then click OK again. 3. After WinFax has installed, click Finish to restart your computer. Follow the instructions on the screen to configure and register WinFax. 4. Insert your PhotoDeluxe CD-ROM. Follow the instructions to accept the license agreement and install PhotoDeluxe. 5. When you see another message asking to restart your computer, click OK. Windows restarts. Now you're ready to print, scan, and copy. See your User's Guide for instructions. Windows 95 or 98 with parallel: Making the connection First, you'll connect the EPSON Stylus Scan to your computer, then you'll install the software. To connect the printer, you'll need a high-speed, bidirectional, IEEE-1284 parallel cable, not more than 6 feet long. If you have a USB port (Windows 98 only), we recommend using it rather than the parallel port. See the previous section for instructions.
-
 1
1 -
 2
2 -
 3
3 -
 4
4
 |
 |