Epson TM-T88V ePOS-Print XML Users Manual - Page 231
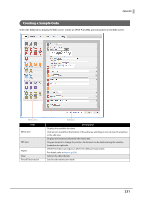
Creating a Sample Code
 |
View all Epson TM-T88V manuals
Add to My Manuals
Save this manual to your list of manuals |
Page 231 highlights
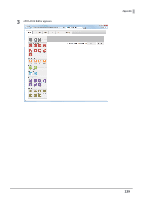
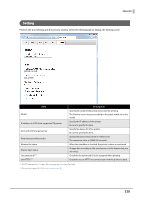
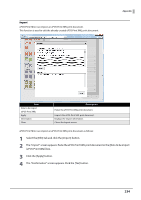
Appendix Creating a Sample Code Select the [Edit] tab to display the Edit screen. Create an ePOS-Print XML print document in the Edit screen. Menu area Item Menu area Edit area Import Clear Forced Transmission Edit area Description Displays the available functions. Click an icon to add it to the bottom of the edit area, and drag an icon to insert it anywhere in the edit area. Displays the functions selected in the menu area. Drag an element to change its position. An element can be deleted using the x button located on its right side. ePOS-Print Editor can import an ePOS-Print XML print document. For details, refer to Import (p.234). Deletes the edited details. Sets forced transmission mode. 231
-
 1
1 -
2
-
3
-
4
-
5
-
6
-
7
-
8
-
9
-
10
-
11
-
12
-
13
-
14
-
15
-
16
-
17
-
18
-
19
-
20
-
21
-
22
-
23
-
24
-
25
-
26
-
27
-
28
-
29
-
30
-
31
-
32
-
33
-
34
-
35
-
36
-
37
-
38
-
39
-
40
-
41
-
42
-
43
-
44
-
45
-
46
-
47
-
48
-
49
-
50
-
51
-
52
-
53
-
54
-
55
-
56
-
57
-
58
-
59
-
60
-
61
-
62
-
63
-
64
-
65
-
66
-
67
-
68
-
69
-
70
-
71
-
72
-
73
-
74
-
75
-
76
-
77
-
78
-
79
-
80
-
81
-
82
-
83
-
84
-
85
-
86
-
87
-
88
-
89
-
90
-
91
-
92
-
93
-
94
-
95
-
96
-
97
-
98
-
99
-
100
-
101
-
102
-
103
-
104
-
105
-
106
-
107
-
108
-
109
-
110
-
111
-
112
-
113
-
114
-
115
-
116
-
117
-
118
-
119
-
120
-
121
-
122
-
123
-
124
-
125
-
126
-
127
-
128
-
129
-
130
-
131
-
132
-
133
-
134
-
135
-
136
-
137
-
138
-
139
-
140
-
141
-
142
-
143
-
144
-
145
-
146
-
147
-
148
-
149
-
150
-
151
-
152
-
153
-
154
-
155
-
156
-
157
-
158
-
159
-
160
-
161
-
162
-
163
-
164
-
165
-
166
-
167
-
168
-
169
-
170
-
171
-
172
-
173
-
174
-
175
-
176
-
177
-
178
-
179
-
180
-
181
-
182
-
183
-
184
-
185
-
186
-
187
-
188
-
189
-
190
-
191
-
192
-
193
-
194
-
195
-
196
-
197
-
198
-
199
-
200
-
201
-
202
-
203
-
204
-
205
-
206
-
207
-
208
-
209
-
210
-
211
-
212
-
213
-
214
-
215
-
216
-
217
-
218
-
219
-
220
-
221
-
222
-
223
-
224
-
225
-
 226
226 -
 227
227 -
 228
228 -
 229
229 -
 230
230 -
 231
231 -
 232
232 -
 233
233 -
 234
234 -
 235
235 -
 236
236
 |
 |

231
Appendix
Creating a Sample Code
Select the [Edit] tab to display the Edit screen. Create an ePOS-Print XML print document in the Edit screen.
Item
Description
Menu area
Displays the available functions.
Click an icon to add it to the bottom of the edit area, and drag an icon to insert it anywhere
in the edit area.
Edit area
Displays the functions selected in the menu area.
Drag an element to change its position. An element can be deleted using the x button
located on its right side.
Import
ePOS-Print Editor can import an ePOS-Print XML print document.
For details, refer to
Import (p.234)
.
Clear
Deletes the edited details.
Forced Transmission
Sets forced transmission mode.
Edit area
Menu area