Epson TM-U675 Installation Manual PT-6000 - Page 2
Using the PT-6000 with an IBM 469X computer with a projection, Installing the DPR-6000, Installing
 |
View all Epson TM-U675 manuals
Add to My Manuals
Save this manual to your list of manuals |
Page 2 highlights
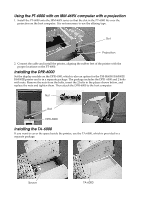
Using the PT-6000 with an IBM 469X computer with a projection 1. Install the PT-6000 onto the IBM 469X series so that the slot in the PT-6000 fits over the projection on the host computer. It is not necessary to use the affixing tape. Slot Projection 2. Connect the cable and install the printer, aligning the rubber feet of the printer with the proper locations on the PT-6000. Installing the DPR-6000 Set the display module on the DPR-6000, which is also an option for the TM-H6000/H6000II/ H6000III printer and is in a separate package. The package includes the DPR -6000 and 2 bolts with nuts. Remove the nuts from the bolts, insert the 2 bolts in the places shown below, and replace the nuts and tighten them. Then attach the DPR-6000 to the host computer. Nut Bolt DPR-6000 Installing the TA-6000 If you want to cover the space beside the printer, use the TA-6000, which is provided in a separate package. Space TA-6000
-
 1
1 -
 2
2
 |
 |
