Epson VS330 Quick Setup - Page 1
Epson VS330 Manual
 |
View all Epson VS330 manuals
Add to My Manuals
Save this manual to your list of manuals |
Page 1 highlights
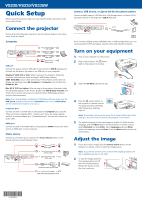
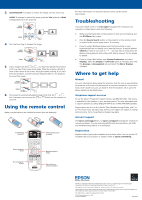
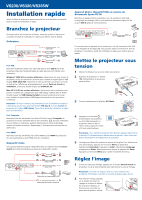
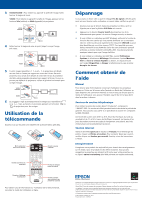
VS230/VS330/VS335W Quick Setup Before using the projector, make sure you read the safety instructions in the online User's Guide. Connect the projector Choose from the following connections. See the sections below or the online User's Guide for details. Computer USB cable HDMI cable VGA cable Audio cable USB port Connect the square end of a USB cable to the projector's USB-B (square) port. Connect the flat end of the cable to any USB port on your computer. Windows® 2000 SP4 or later: After turning on the projector, follow the on-screen instructions to install the Epson® USB Display software (EMP_UDSE.EXE; only on first connection). If the software screen does not display automatically, open My Computer or Computer, then double-click EPSON_PJ_UD. Mac OS X 10.5.8 or higher: After turning on the projector, the setup folder for USB Display appears in the Finder. Double-click USB Display Installer and follow the on-screen instructions to install the Epson USB Display software (only on first connection). Note: If you have problems installing the USB Display software, make sure the USB Type B setting in the projector's Extended menu is set to USB Display. See the online User's Guide for instructions. Computer port Connect one end of a VGA cable to the projector's Computer port, and the other end to your computer's monitor port. If you are using a laptop, switch it to external display (see "Troubleshooting"). You can also connect an audio cable. HDMI port Connect one end of an HDMI cable to the projector's HDMI port and the other end to an HDMI port on your computer. Video device Connect up to 4 video devices and use the Source Search button on the remote control to switch between them. Audio cable S-Video cable HDMI cable Component video to VGA cable RCA video cable (composite video) Camera, USB device, or Epson DC-06 document camera Connect a digital camera, USB flash drive, USB storage device, or Epson DC-06 document camera to the projector's USB-A (flat) port. USB cable If you connect a digital camera, USB flash drive, or USB storage device, you can use the projector's PC Free feature. See the online User's Guide for details. Turn on your equipment 1 Turn on your computer or video source. 2 Plug in the projector. The power light on the projector turns blue. 3 Open the A/V Mute slide all the way. 4 Press the power button on the projector or remote control. The projector beeps, the Status light flashes blue, and then stays on. Note: To shut down the projector, press the power button twice, then unplug it. You don't have to wait for the projector to cool down. 5 The default language of the menu system is English. To select another language, press the Menu button on the projector or remote control. Select Extended and press Enter. Select Language and press Enter. Select your language and press Enter. Press the Menu button to exit the menu system. Adjust the image 1 If you don't see an image, press the Source Search button on the projector or remote control to select the image source. Note: If you still see a blank screen or have other display problems, see the troubleshooting tips on the right. 2 To raise the image, press the foot release button and lift the front of the projector. Release the button to lock the foot in position. *412526500* *412526500*
-
 1
1 -
 2
2 -
 3
3 -
 4
4
 |
 |
