Epson WorkForce 40 Network Installation Guide - Page 27
Finish the Installation, Windows - network installation guide
 |
View all Epson WorkForce 40 manuals
Add to My Manuals
Save this manual to your list of manuals |
Page 27 highlights
Finish the Installation Follow the steps for your operating system: ■ "Windows" below ■ "Mac OS X" on page 28 Windows 1. Follow the on-screen instructions. After making a successful network connection, you see this screen: 2. If desired, you can do the following: ■ Enter a new name for the printer in the Printer Name text box (optional) ■ Select Set as default to make the printer your default printer (optional) 3. Click Next and follow the on-screen instructions to finish installing software and print a test page. When installation is complete, you're ready to print. See your Quick Guide or on-screen Epson Information Center for details. Finish the Installation 27
-
 1
1 -
2
-
3
-
4
-
5
-
6
-
7
-
8
-
9
-
10
-
11
-
12
-
13
-
14
-
15
-
16
-
17
-
18
-
19
-
20
-
21
-
 22
22 -
 23
23 -
 24
24 -
 25
25 -
 26
26 -
 27
27 -
 28
28 -
 29
29 -
 30
30 -
 31
31 -
 32
32 -
33
-
34
-
35
-
36
 |
 |

Finish the Installation
27
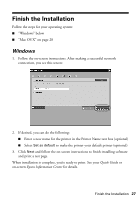
Finish the Installation
Follow the steps for your operating system:
■
“Windows” below
■
“Mac OS X” on page 28
Windows
1.
Follow the on-screen instructions. After making a successful network
connection, you see this screen:
2.
If desired, you can do the following:
■
Enter a new name for the printer in the Printer Name text box (optional)
■
Select
Set as default
to make the printer your default printer (optional)
3.
Click
Next
and follow the on-screen instructions to finish installing software
and print a test page.
When installation is complete, you’re ready to print. See your
Quick Guide
or
on-screen
Epson Information Center
for details.