Epson WorkForce 630 User Manual
Epson WorkForce 630 Manual
 |
View all Epson WorkForce 630 manuals
Add to My Manuals
Save this manual to your list of manuals |
Epson WorkForce 630 manual content summary:
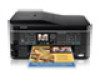
- Epson WorkForce 630 | User Manual - Page 1
WorkForce® 630 Series Includes WorkForce 630/632/633/635 Quick Guide Basic Copying, Printing, Scanning, and Faxing Maintenance Network Setup Solving Problems - Epson WorkForce 630 | User Manual - Page 2
10 Printing From a Memory Card 12 Inserting the Card 12 Printing Photos From the LCD Screen 13 Printing From Your Computer 14 Printing in Windows 14 Printing With a Macintosh 15 Selecting the Correct Paper Type 17 Faxing a Document 18 Connecting a Phone or Answering Machine 18 Setting - Epson WorkForce 630 | User Manual - Page 3
Checking the Print Head Nozzles 26 Cleaning the Print Head 27 Checking Ink Levels 27 Purchasing Epson Ink Cartridges 28 Replacing Ink Cartridges 29 Network Setup 31 Wireless Network Setup 31 Wired (Ethernet) Network Setup 45 Solving Problems 49 Checking for Software Updates 49 Problems and - Epson WorkForce 630 | User Manual - Page 4
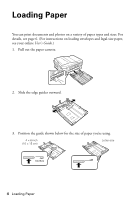
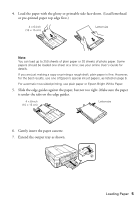
Loading Paper You can print documents and photos on a variety of paper types and sizes. For details, see page 6. (For instructions on loading envelopes and legal-size paper, see your online User's Guide.) 1. Pull out the paper cassette. 2. Slide the edge guides outward. 3. Position the guide shown - Epson WorkForce 630 | User Manual - Page 5
results, use one of Epson's special ink jet papers, as listed on page 6. For automatic two-sided printing, use plain paper or Epson Bright White Paper. 5. Slide the edge guides against the paper, but not too tight. Make sure the paper is under the tabs on the edge guides. 4 × 6-inch (10 × 15 cm - Epson WorkForce 630 | User Manual - Page 6
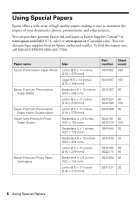
genuine Epson ink and paper at Epson Supplies CentralSM at www.epson.com/ink3 (U.S. sales) or www.epson.ca (Canadian sales). You can also purchase supplies from an Epson authorized reseller. To find the nearest one, call 800-GO-EPSON (800-463-7766). Paper name Size Epson Presentation Paper Matte - Epson WorkForce 630 | User Manual - Page 7
5 × 7 inches (127 × 178 mm) Borderless 8 × 10 inches (203 × 254 mm) Letter (8.5 × 11 inches [216 × 279 mm]) Borderless 4 × 6 inches (102 × 152 mm) Letter (8.5 × 11 inches [216 × 279 mm]) Epson Bright White Paper Letter (8.5 × 11 inches [216 × 279 mm]) Epson Photo Quality Selfadhesive Sheets A4 - Epson WorkForce 630 | User Manual - Page 8
Placing Originals for Copying, Scanning, or Faxing Before you copy, scan, or fax, place your documents or photos on sheets, or 10 legal-size sheets (single-sided only), in the Automatic Document Feeder (ADF). 1. Open the Automatic Document Feeder paper support, and then move the edge guide outward. - Epson WorkForce 630 | User Manual - Page 9
edges. 3. Insert the originals face-up, top edge first. The ADF icon appears on the screen. Note: If you're using the 2-up Copy layout, make sure the originals are loaded as shown below. 4. Slide the edge guide against the originals, but not too tight. Using the Automatic Document Feeder 9 - Epson WorkForce 630 | User Manual - Page 10
10-inch, letter-size, or A4-size Epson photo paper (various types available) for instant photo reprints. See the online User's Guide for details. To turn off the "beep" heard when you press a button, press F Setup, select Printer Setup -size paper is automatically selected for your printed copies. - Epson WorkForce 630 | User Manual - Page 11
quality, press the Quality button and choose Draft or Best. 8. To change other print settings, press x Menu, then select Paper and Copy Settings. ■ To make double-sided copies (some models only), select 2-Sided Printing. (On the WorkForce 635, you can quickly open this menu by pressing the 2-Sided - Epson WorkForce 630 | User Manual - Page 12
you're ready to print. See the online User's Guide for instructions on copying memory card files between your Epson printer and a computer, and printing photos pre-selected in your camera (DPOF™ or Digital Print Order Format). Inserting the Card 1. Make sure your printer is turned on. 2. Insert - Epson WorkForce 630 | User Manual - Page 13
display screen. 1. Load several sheets of Epson photo paper (various types available; see page 6). 2. Press the Photo button, then select View and Print Photos. You see this screen: 3. Press l or r to scroll through your photos and display one that you want to print. Note: To crop the photo, press - Epson WorkForce 630 | User Manual - Page 14
Epson product software; see page 49. Printing in Windows 1. Open a photo or document in a printing program, and select the print option. 2. Select your product, then click the Preferences or Properties button. 3. On the Main tab, select basic print settings. Make sure you choose the correct paper - Epson WorkForce 630 | User Manual - Page 15
printing from Mac OS X 10.4, see your online User's Guide for instructions. 1. Open a photo or document in a printing program, open the File menu, and select Print. 2. Select your product as the Printer setting. Select your Epson product Click to expand 3. Click the arrow to expand the Print window - Epson WorkForce 630 | User Manual - Page 16
or check for it at the bottom of this window. Copy and page settings Application settings 5. Choose Print Settings from the pop-up menu, and select these print settings: Choose Print Settings Select your Media Type (see page 17) Select Color or Black/Grayscale output Select higher quality or faster - Epson WorkForce 630 | User Manual - Page 17
the print job Selecting the Correct Paper Type Select the correct Type (see page 14) or Media Type (see page 16) setting in your printer software so the ink coverage can be adjusted accordingly. For this paper/media Plain paper Epson Bright White Paper Epson Presentation Paper Matte Epson Photo - Epson WorkForce 630 | User Manual - Page 18
using the one-touch dial buttons. Using the Automatic Document Feeder, you can fax up to 30 pages at a time. Note: You can also send a fax from your computer using the Epson FAX Utility. With Windows, see the online User's Guide. With Macintosh, download the utility from the Epson support web site - Epson WorkForce 630 | User Manual - Page 19
your product to detect an incoming fax call when the phone is picked up. Epson cannot guarantee compatibility with VoIP, cable phone systems, or fiberoptic digital services such as FiOS™. Setting Up Fax Features Before sending or receiving faxes, you should create a fax header and select the number - Epson WorkForce 630 | User Manual - Page 20
If you connected an answering machine and it is set to pick up on the fourth ring, you should set the WorkForce 630/632/633/635 Series to pick up on the fifth ring or later: 1. Press the Fax button, then press x Menu. 2. Press u or d to select Communication, then press OK. 3. Press u or d to select - Epson WorkForce 630 | User Manual - Page 21
can enter up to 64 digits. 4. To change fax settings, press x Menu and select settings as necessary. 5. Press the B&W or Color x Start button to send your fax. Note: If the recipient's fax machine prints only in black and white, your fax is automatically sent in black and white even if you select - Epson WorkForce 630 | User Manual - Page 22
. Auto Answer light Note: To change the number of rings before the product answers, see page 20. If you run out of paper during printing, you see an error message. Load more paper and press the B&W or Color x Start button to continue. To receive faxes manually, turn off the Auto Answer light - Epson WorkForce 630 | User Manual - Page 23
WorkForce 630/632/633 Mac OS X 10.6" on page 25. 1. Place your original document or photo as shown on page 8. 2. Press the Scan button. 3. Press u or d to select one a memory card, select your scan settings then press x Start Scan to begin Windows Explorer or Macintosh Finder, or as an attachment in - Epson WorkForce 630 | User Manual - Page 24
instructions, see the online User's Guide. 1. Place your original document or photo as shown on page 8. 2. Do one of the following to start Epson Scan: ■ Windows: Double-click the EPSON Scan icon on your desktop. ■ Mac OS X 10.4 and 10.5: Double-click EPSON Scan in Applications > Epson Software - Epson WorkForce 630 | User Manual - Page 25
scanned and you see its icon in Windows Explorer or Macintosh Finder. Scanning With Mac OS X 10.6 You can scan original documents and photos your product. 2. If you would like to select scan settings, such as Color Restoration and file save settings, click Show Details. 3. Click the Scan button to - Epson WorkForce 630 | User Manual - Page 26
Maintaining Your Product Follow the instructions in this chapter to check and clean the print head nozzles, check ink levels, and replace ink cartridges. If you need to align the print head, see the online User's Guide. Caution: To keep your product looking like new, don't place anything on top of - Epson WorkForce 630 | User Manual - Page 27
head. Print head cleaning uses ink, so clean it only if necessary. Note: You cannot clean the print head if an ink cartridge is expended, and may not be able to clean it when a cartridge is low. You must replace the cartridge first (see page 29). 1. Load a few sheets of plain paper. 2. Press F Setup - Epson WorkForce 630 | User Manual - Page 28
print when ink is low. This window can optionally display ink offers and other updates from Epson. Note: To disable checking for ink offers or updates from Epson, see the instructions in your online User's Guide. Purchasing Epson Ink Cartridges You can purchase genuine Epson ink and paper at Epson - Epson WorkForce 630 | User Manual - Page 29
you begin. Caution: Do not open ink cartridge packages until you are ready to install the ink. Cartridges are vacuum packed to maintain reliability. Leave the expended cartridge installed until you have obtained a replacement, or the ink remaining in the print head nozzles may dry out. 1. Turn on - Epson WorkForce 630 | User Manual - Page 30
touch the green chip on the front of the cartridge. This can damage the ink cartridge. 7. Insert the new ink cartridge into the holder and push it down until it clicks into place. 8. Once you replace all the cartridges that need replacing, close the cartridge cover and push it down until it clicks - Epson WorkForce 630 | User Manual - Page 31
section provide detailed instructions for setting up your product on a wireless network. You must install the software on every computer from which you want to print. For the first installation, we recommend using a USB cable (not included) to simplify wireless setup. After the printer is connected - Epson WorkForce 630 | User Manual - Page 32
the product software CD. 3. Windows 7 and Windows Vista®: If you see the AutoPlay window, click Run Setup.exe. When you see the User Account Control screen, click Yes or Continue. Windows XP: When you see the Software Installation screen, continue with step 4. Mac OS X: Double-click the Epson icon - Epson WorkForce 630 | User Manual - Page 33
and click Next. 6. When you see this screen, select Set up printer for the first time, then click Next. 7. Mac OS X 10.6: At the next screen, click Next. Then skip to "Setting Up With the Product Buttons" on page 38 to set up the product without using a temporary USB connection. Wireless Network - Epson WorkForce 630 | User Manual - Page 34
using printer buttons, continue with "Setting Up With the Product Buttons" on page 38. Setting Up With a Temporary USB Cable Do not connect the USB cable to your product until instructed to do so in the on-screen instructions. 1. Wait while the software is installed. 34 Wireless Network Setup - Epson WorkForce 630 | User Manual - Page 35
computer with a USB cable. 3. Follow the on-screen instructions to continue installing the software. 4. When you see the Firewall Warning screen, click Next. Note: If you see a firewall alert message, click Unblock or Allow to let EpsonNet Setup continue. Do not select Ask Me Later, Keep Blocking - Epson WorkForce 630 | User Manual - Page 36
the following, select your network name (SSID) from the list, then click Next. Note: If your network name isn't in the list, select Enter Manually. If your network name contains uppercase (ABC) or lowercase (abc) letters, enter them correctly. 6. If you see a screen like the following, enter your - Epson WorkForce 630 | User Manual - Page 37
, then click Finish. 10. Follow the on-screen instructions to install the rest of your software. When installation is complete, remove the CD and restart your computer. To set up additional computers to print to the product, see "Setting Up Additional Computers" on page 42. Wireless Network Setup 37 - Epson WorkForce 630 | User Manual - Page 38
Product Buttons If you are using Mac OS X 10.6, or you don't have a USB cable to set up the product on your wireless network, follow these steps to set it up using the product buttons: 1. Follow the instructions on the screen to start the product's wireless Setup Wizard. 2. When you see this screen - Epson WorkForce 630 | User Manual - Page 39
uppercase or lowercase letters, or numbers, be sure to enter them correctly. Note: If the product still doesn't connect to your wireless network, see "Network setup failed" on page 49. 5. Mac OS X 10.6: Skip to step 10 on page 40. 6. Wait while the software is installed. Wireless Network Setup 39 - Epson WorkForce 630 | User Manual - Page 40
, or Block. 8. Wait while EpsonNet Setup configures your product for the network. 9. When you see the Installation Complete screen, print a test page, then click Finish. 10. Follow the instructions on the screen to install the rest of your software. When installation is complete, remove the CD and - Epson WorkForce 630 | User Manual - Page 41
up additional computers to print to the product, see "Setting Up Additional Computers" on page 42. Entering Your SSID Manually If your network doesn't broadcast its name (SSID), follow these steps to enter it: Continue with step 3 on page 39 to enter your network password. Wireless Network Setup 41 - Epson WorkForce 630 | User Manual - Page 42
the product software CD. 3. Windows 7 and Windows Vista: If you see the AutoPlay window, click Run Setup.exe. When you see the User Account Control screen, click Yes or Continue. Windows XP: When you see the Software Installation screen, continue with step 4. Mac OS X: Double-click the Epson icon - Epson WorkForce 630 | User Manual - Page 43
The printer is already on my wireless network, then click Next. 7. Wait while the software is installed. 8. Mac OS X 10.6: Skip to step 13 on page 44. 9. When you see the Firewall Warning screen, click Next. Note: If you see a firewall alert message, click Unblock or Allow to let EpsonNet Setup - Epson WorkForce 630 | User Manual - Page 44
10. If you see a screen like this one, select the product you would like to set up, then click Next. 11. Wait while EpsonNet Setup configures your product for the network. 12. When you see the Installation Complete screen, print a test page, then click Finish. 13. Follow the instructions on the - Epson WorkForce 630 | User Manual - Page 45
the product software CD. 3. Windows 7 and Windows Vista: If you see the AutoPlay window, click Run Setup.exe. When you see the User Account Control screen, click Yes or Continue. Windows XP: When you see the Software Installation screen, continue with step 4. Mac OS X: Double-click the Epson icon - Epson WorkForce 630 | User Manual - Page 46
you see this screen, do one of the following: ■ For a first-time installation, choose Set up printer for the first time, then click Next. ■ If the printer has already been set up for network printing and you want to be able to print from an additional computer, choose The printer is already on my - Epson WorkForce 630 | User Manual - Page 47
Next. 8. Mac OS X 10.6: Skip to step 15 on page 48. 9. Wait while the software is installed, then click Next to start network installation. 10. When you see the Firewall Warning screen, click Next. Note: If you see a firewall alert message, click Unblock or Allow to let EpsonNet Setup continue. Do - Epson WorkForce 630 | User Manual - Page 48
you would like to set up, then click Next. 12. Wait while EpsonNet Setup configures your product for the network. 13. If you see an Installation Complete screen that includes a Print Test Page button, click it to print a test page. 14. Click Finish. 15. Follow the instructions on the screen to - Epson WorkForce 630 | User Manual - Page 49
to your product software. Open your online User's Guide and select Download the Latest Software or visit Epson's support website at epson.com/support (U.S.) or epson.ca/support (Canada). With Windows, you can select Driver Update on the Maintenance tab in the printer settings window. You can also - Epson WorkForce 630 | User Manual - Page 50
available in Mac OS X 10.6; see page 25 for scanning instructions. ■ If you cannot scan from the product's control panel, make sure you restarted your computer after installing the product software. Make sure Epson Event Manager is not being blocked by your firewall or security software. ■ If you - Epson WorkForce 630 | User Manual - Page 51
, you may be able to continue printing temporarily with black ink; see the online User's Guide for more information. If the black cartridge is expended, you must replace it to continue printing. Paper Feeding Problems If paper doesn't feed correctly, remove the paper and fan the sheets, then reload - Epson WorkForce 630 | User Manual - Page 52
on to receive faxes automatically. ■ If your phone line includes voice mail answering services, calls or faxes may be inadvertently received by your voice mail service. ■ If the line has static, press Fax, press x Menu, select Communication, and turn off the V.34 and ECM settings. 52 Problems and - Epson WorkForce 630 | User Manual - Page 53
to align the print head. See the online User's Guide for instructions. ■ The ink cartridges may be low on ink. Check your cartridge levels (see page 27) and replace cartridges, if necessary (see page 29). ■ Clean the scanner glass with a soft, dry, lint-free cloth (paper towels are not recommended - Epson WorkForce 630 | User Manual - Page 54
to common problems. You can download drivers and documentation, get FAQs and troubleshooting advice, or e-mail Epson with your questions. Speak to a Support Representative Before you call Epson for support, please have the following information ready: ■ Product name (WorkForce 630/632/633/635 Series - Epson WorkForce 630 | User Manual - Page 55
Notices Important Safety Instructions Before using your Epson product, read and follow these safety instructions: ■ Be sure to follow all warnings and instructions marked on the product. ■ Use only the type of power source indicated on the product label. ■ Use only the power cord that comes with the - Epson WorkForce 630 | User Manual - Page 56
not covered by the operating instructions. ■ When storing or transporting the product, do not tilt it, stand it on its side, or turn it upside down; otherwise ink may leak from the cartridges. ■ Always keep this guide handy. LCD Screen Safety ■ Use only a dry, soft cloth to clean the LCD screen. Do - Epson WorkForce 630 | User Manual - Page 57
, make sure the print head is in the home (far right) position and the ink cartridges are in place. ■ Install a new ink cartridge immediately after removing a used one. Leaving cartridges uninstalled can dry out the print head and may prevent the product from printing. ■ Do not shake ink cartridges - Epson WorkForce 630 | User Manual - Page 58
or CPU Boards and Power Supplies used with Class B Personal Computers: We: Located at: Epson America, Inc. Name: Epson Type of Product: Multifunction printer Model: C422A FCC local telephone company. The information associated with the services the equipment is to be connected are REN: - Epson WorkForce 630 | User Manual - Page 59
is designed to be connected to a compatible modular jack that is also compliant. See installation instructions for details. The Telephone Consumer Protection Act of 1991 makes it unlawful for any person to use a computer or other electronic device, including fax machines, to send any message unless - Epson WorkForce 630 | User Manual - Page 60
installation of this equipment Model C422A does not disable your alarm equipment. If you have questions about what will disable alarm equipment, consult your telephone company or a qualified installer more than one interface connector, do not leave cables connected to unused interfaces. Changes or - Epson WorkForce 630 | User Manual - Page 61
from the Epson authorized service center. When warranty service involves the exchange of the printer or a part, the item replaced becomes Epson property. The replacement printer or part may be new or refurbished to the Epson standard of quality, and, at Epson's option, may be another model of like - Epson WorkForce 630 | User Manual - Page 62
, damage caused by disasters such as fire, flood, and lightning, improper electrical current, software problems, interaction with non-Epson products, or service other than by an Epson Authorized Servicer. If a claimed defect cannot be identified or reproduced, you will be held responsible for - Epson WorkForce 630 | User Manual - Page 63
instructions. Seiko Epson Corporation shall not be liable for any damages or problems arising from the use of any options or any consumable products other than those designated as Original Epson Products or Epson Approved Products by Seiko Epson Corporation. In addition to software program - Epson WorkForce 630 | User Manual - Page 64
CPD-27869 Printed in XXXXXX
-
 1
1 -
 2
2 -
 3
3 -
 4
4 -
 5
5 -
 6
6 -
 7
7 -
8
-
9
-
10
-
11
-
12
-
13
-
14
-
15
-
16
-
17
-
18
-
19
-
20
-
21
-
22
-
23
-
24
-
25
-
26
-
27
-
28
-
29
-
30
-
31
-
32
-
33
-
34
-
35
-
36
-
37
-
38
-
39
-
40
-
41
-
42
-
43
-
44
-
45
-
46
-
47
-
48
-
49
-
50
-
51
-
52
-
53
-
54
-
55
-
56
-
57
-
58
-
59
-
60
-
61
-
62
-
63
-
64
 |
 |
WorkForce
630 Series
Includes WorkForce 630/632/633/635
Quick Guide
Basic Copying, Printing, Scanning, and Faxing
Maintenance
Network Setup
Solving Problems
®