Epson WorkForce Pro WP-4530 Quick Guide - Page 13
Receiving Faxes
 |
View all Epson WorkForce Pro WP-4530 manuals
Add to My Manuals
Save this manual to your list of manuals |
Page 13 highlights
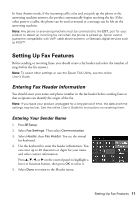
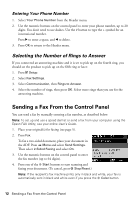
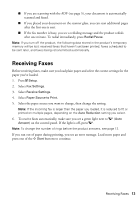
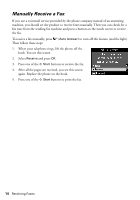
■ If you are scanning with the ADF (see page 5), your document is automatically scanned and faxed. ■ If you placed your document on the scanner glass, you can scan additional pages after the first one is sent. ■ If the fax number is busy, you see a redialing message and the product redials after one minute. To redial immediately, press Redial/Pause. Note: If you turn off the product, the following data stored in the product's temporary memory will be lost: received faxes that haven't yet been printed, faxes scheduled to be sent later, and faxes being retransmitted automatically. Receiving Faxes Before receiving faxes, make sure you load plain paper and select the correct settings for the paper you've loaded. 1. Press F Setup. 2. Select Fax Settings. 3. Select Receive Settings. 4. Select Paper Source to Print. 5. Select the paper source you want to change, then change the setting. Note: If the incoming fax is larger than the paper you loaded, it is reduced to fit or printed on multiple pages, depending on the Auto Reduction setting you select. 6. To receive faxes automatically, make sure you see a green light next to (Auto Answer) on the control panel. If the light is off, press . Note: To change the number of rings before the product answers, see page 12. If you run out of paper during printing, you see an error message. Load more paper and press one of the x Start buttons to continue. Receiving Faxes 13
-
 1
1 -
2
-
3
-
4
-
5
-
6
-
7
-
 8
8 -
 9
9 -
 10
10 -
 11
11 -
 12
12 -
 13
13 -
 14
14 -
 15
15 -
 16
16 -
 17
17 -
 18
18 -
19
-
20
-
21
-
22
-
23
-
24
-
25
-
26
-
27
-
28
-
29
-
30
-
31
-
32
-
33
-
34
-
35
-
36
-
37
-
38
-
39
-
40
-
41
-
42
-
43
-
44
-
45
-
46
-
47
-
48
-
49
-
50
-
51
-
52
-
53
-
54
-
55
-
56
-
57
-
58
-
59
-
60
-
61
-
62
-
63
-
64
-
65
-
66
-
67
-
68
-
69
-
70
-
71
-
72
-
73
-
74
-
75
-
76
-
77
-
78
-
79
-
80
 |
 |
