Fagor Lux Multicooker User Manual - Page 8
Heating Element and Temperature Sensor
 |
View all Fagor Lux Multicooker manuals
Add to My Manuals
Save this manual to your list of manuals |
Page 8 highlights
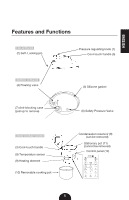
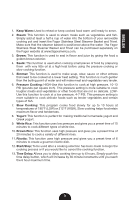
ENGLISH 1. Pressure Regulating Knob: Turn the regulating knob to the "Pressure" position when cooking under pressure or when using any of the rice cooking functions. Turn the knob to the "Steam" position to release the pressure after pressure cooking or rice cooking and when using the STEAM function. When using the SLOW COOKER or KEEP WARM functions, be sure to turn the pressure regulating knob to the "Steam" position and not to the "Pressure" position. 2. Self-Locking Pin: The lid will lock automatically when it is properly aligned and closed. While cooking under pressure you will not be able to open the lid until all of the pressure is released. 3. Cool-Touch Handles: The cool to the touch handles of the Multi-cooker allows for easy handling and opening of the lid. 4. Floating Valve: The floating valve controls the amount of pressure inside the cooker by allowing excess pressure to be released. 5. Silicone Gasket: Creates an airtight seal needed for the cooker to build pressure. Check the silicone gasket for any tears or cracks before using the Multi-Cooker. To order a new gasket, please contact a Fagor Representative at 1-800-207-0806 or purchase it directly on the Fagor website at www.fagoramerica.com. 6. Safety Pressure Valve: The safety pressure valve allows excess pressure to escape from the cooker when it is being used for pressure cooking. It works independently of the floating valve. 7. Anti-Blocking Case: Pull it towards yourself to release the pressure regulator knob for cleaning. 8. Condensation Reservoir: Collects excess condensation during cooking. If there is some liquid in the reservoir after cooking, simply empty it. 9. Heating Element and Temperature Sensor: Both elements regulate the cooking temperature inside the pot. 10. Removable Cooking Pot: Stainless steel pot is dishwasher safe, but hand washing is always recommended. 11. Stationary Pot: This pot cannot be removed from the electric multi-cooker and should NEVER be used for cooking. Before cooking, make sure to place the removable cooking pot into the stationary pot first. All ingredients should be placed into the removable cooking pot ONLY. 12. Control Panel: The easy to use controls allow you to select the different programs available with a touch of a finger. Available for selection are: two pressure cooking settings, two slow cooking settings, white rice, brown rice, risotto, brown, sauté, simmer, steam, yogurt, keep warm, time delay, start/ stop and a plus and minus button to adjust cooking time and time delay. Also, on the control panel you will find the HIGH and LOW indicator lights which will blink while pressure or temperature is building. These three lights will go solid once the unit has reached proper pressure or temperature. 6
-
 1
1 -
2
-
 3
3 -
 4
4 -
 5
5 -
 6
6 -
 7
7 -
 8
8 -
 9
9 -
 10
10 -
 11
11 -
 12
12 -
 13
13 -
14
-
15
-
16
-
17
-
18
-
19
-
20
-
21
-
22
-
23
-
24
-
25
-
26
-
27
-
28
-
29
-
30
-
31
-
32
-
33
-
34
-
35
-
36
-
37
-
38
-
39
-
40
-
41
-
42
-
43
-
44
-
45
-
46
-
47
-
48
-
49
-
50
-
51
-
52
-
53
-
54
-
55
-
56
-
57
-
58
-
59
-
60
-
61
-
62
-
63
-
64
-
65
-
66
-
67
-
68
-
69
-
70
-
71
-
72
-
73
-
74
-
75
-
76
-
77
-
78
-
79
-
80
-
81
-
82
-
83
-
84
-
85
-
86
-
87
-
88
-
89
-
90
-
91
-
92
 |
 |
