Fantec CL-35B2 User Manual - Page 2
Detailed View, 7 HDD Installation - reset
 |
View all Fantec CL-35B2 manuals
Add to My Manuals
Save this manual to your list of manuals |
Page 2 highlights
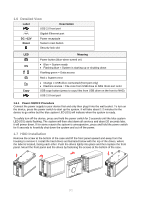
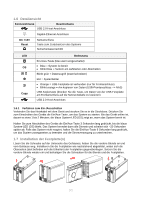
1.6 Detailed View Label Description USB 2.0 host port Gigabit Ethernet port DC +12V Power receptacle Reset System reset button Security lock slot LED OS Copy Meaning Power button (blue when turned on) Blue = System ready Flashing blue = System is starting up or shutting down Flashing green = Data access Red = System error Orange = USB drive connected (front port only) Flashing orange = File copy from USB drive to NAS (front port only) USB copy button (press to copy files from USB drive on the front to NAS) USB 2.0 host port 1.6.1 Power ON/OFF Procedure Connect the power supply to your device first and only then plug it into the wall socket. To turn on the device, press the power switch to start up the system. It will take about 1-2 minutes for the device to go online but the blue system LED (OS) will indicate when the system is ready. To safely turn off the device, press and hold the power switch for 3 seconds until the blue system LED (OS) starts flashing. The system will then shut down all services and about 20 seconds later, it will power down. If for some reason the system is unresponsive, press and hold the power switch for 6 seconds to forcefully shut down the system and cut off the power. 1.7 HDD Installation Remove the screw at the bottom of the case and lift the front panel upward and away from the housing to remove it. Install the hard drives as illustrated below with the top of the drives, where the label is located, facing each other. Push the drives lightly into place and then replace the front panel. Mount the front panel and the drives by fastening the screws at the bottom of the case. [2]
-
 1
1 -
 2
2 -
 3
3 -
 4
4 -
 5
5 -
 6
6 -
 7
7 -
 8
8 -
9
-
10
-
11
-
12
 |
 |