Fisher and Paykel GWL11 User Guide - Page 8
Step 4, Step 5 - won t spin
 |
View all Fisher and Paykel GWL11 manuals
Add to My Manuals
Save this manual to your list of manuals |
Page 8 highlights
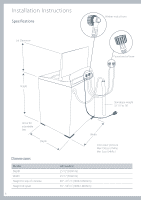
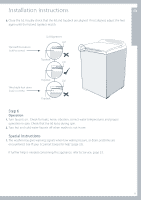
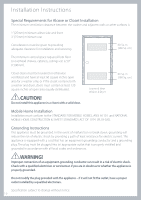
Installation Instructions Step 4 Inlet Hoses 1. Install hoses with the straight end (with filters) fitted to the faucets. 2. Install elbow ends onto washing machine (inlet valves are marked on the back of the machine H=hot, C=cold) Note: If there is a cold water supply only, an inlet valve cap (available from Fisher & Paykel) MUST be connected to the hot valve. The cap prevents water leaking from the hot valve. Step 5 Leveling the Washer 1. Insert the four rubber leveling feet inserts into the feet on the base of the washer. (See diagram 1). 2. Move the washer into its final position. We suggest a minimum clearance of 1" (25mm) on each side for ease of installation. (See diagram 2). 1. Faucet end of hose 2. Washer end of hose Adjustable feet Rubber insert Diagram 1 1" (25mm) 1" (25mm) 3. Turn on water and check hose connections for leaks. Check that there are no kinks in the hoses. 4. It is IMPORTANT to level the washer to ensure proper performance during spin. Adjust the feet by unscrewing/screwing to make sure the washer is level and cannot rock. Diagram 2 5. Use the walls and adjacent counter tops as a sight guide to check to see if washer appears level. Readjust the feet if necessary. 6. Open the lid and check the washer basket to see that it sits slightly forward of centre. (See diagram 3). 8 Incorrect adjustment Correct adjustment Diagram 3
-
 1
1 -
2
-
 3
3 -
 4
4 -
 5
5 -
 6
6 -
 7
7 -
 8
8 -
 9
9 -
 10
10 -
 11
11 -
 12
12 -
 13
13 -
14
-
15
-
16
-
17
-
18
-
19
-
20
-
21
-
22
-
23
-
24
-
25
-
26
-
27
-
28
-
29
-
30
-
31
-
32
-
33
-
34
-
35
-
36
-
37
-
38
-
39
-
40
-
41
-
42
-
43
-
44
-
45
-
46
-
47
-
48
-
49
-
50
-
51
-
52
-
53
-
54
-
55
-
56
-
57
-
58
-
59
-
60
-
61
-
62
-
63
-
64
-
65
-
66
-
67
-
68
 |
 |
