Fisher and Paykel RS36A72U1 Installation Manual - Page 24
Hanging Non-water Dispensing Door Panels
 |
View all Fisher and Paykel RS36A72U1 manuals
Add to My Manuals
Save this manual to your list of manuals |
Page 24 highlights
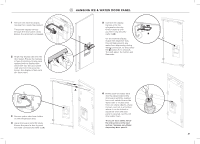
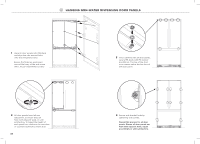
!6 HANGING NON-WATER DISPENSING DOOR PANELS 1 Hang all door panels onto M8 studs and align the side bracket forks onto the refrigerator door. Ensure the forks are positioned around the body of the side screw (M5 x 10 pan head Phillips screw). 3 Once satisfied with all door panels, secure M8 studs with M8 washer and M8 nut. The top of the stud must remain below the top face of the door panel. 2 All door panels have full axis adjustment to ensure they are flush with adjacent walls, or until satisfactory. To adjust the height of each panel turn clockwise to raise stud or counter-clockwise to lower stud. 22 4 Secure side bracket forks by tightening side screws. Repeat this process for all door panels. Ensure all door panels are flush with adjacent walls, adjust accordingly or until satisfactory.
-
 1
1 -
2
-
3
-
4
-
5
-
6
-
7
-
8
-
9
-
10
-
11
-
12
-
13
-
14
-
15
-
16
-
17
-
18
-
 19
19 -
 20
20 -
 21
21 -
 22
22 -
 23
23 -
 24
24 -
 25
25 -
 26
26 -
 27
27 -
 28
28
 |
 |
