Fluke Calibration 1620A-H-156 Getting Started Guide - Page 14
Connect the Sensor, Connect the Power Source, Switch the Power On, Measure Temperature
 |
View all Fluke Calibration 1620A-H-156 manuals
Add to My Manuals
Save this manual to your list of manuals |
Page 14 highlights
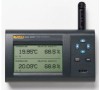
1620A "DewK" Thermo-Hygrometer Getting Started Guide Connect the Sensor The sensor for channel 1 connects to the socket at the top-right, and the sensor for channel 2, if used, connects to the socket on the right side. Either sensor may be used with an optional extension cable up to 100 feet (30 meters) in length. Connect the Power Source The thermo-hygrometer draws power from the provided power adapter. Plug the adapter into a wall outlet of the appropriate voltage and insert the DC plug into the DC power input of the thermo-hygrometer. Switch the Power On Power is turned on and off with the power switch located below the stand on the back panel. To switch the power on, toggle the power switch to the ' ' position. To switch power off, toggle the power switch to the ' ' position. The instrument takes a few seconds to power up, initialize, and begin normal operation. A self-test is performed, displaying the channel configuration and status of the system, calibration, % battery power, memory, and buttons. If the thermo-hygrometer calibration has expired and the alert message is enabled, the user is notified and must press the Enter button to continue initialization. If an error message is displayed on power up see the Troubleshooting section in the User's Guide. Measure Temperature After initialization, the temperature and relative humidity measurements for the enabled channels are displayed. If recording is enabled, the measurements will be automatically stored in memory. The display can be configured to display the measurements in a variety of numerical and graphical formats. For information on the various modes of operation of the thermo-hygrometer, see the Menu Functions section of the User's Guide. 10
-
 1
1 -
2
-
3
-
4
-
5
-
6
-
7
-
8
-
 9
9 -
 10
10 -
 11
11 -
 12
12 -
 13
13 -
 14
14 -
 15
15 -
 16
16 -
 17
17 -
 18
18 -
 19
19 -
20
-
21
-
22
-
23
-
24
-
25
-
26
 |
 |
