Frigidaire FAA055P7A Use and Care Manual - Page 7

You Will See How Much Time Is Chosen

Page 7 highlights

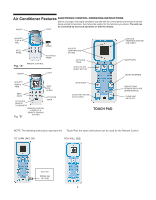
Air Conditioner Features (continued) TO OPERATE ON FAN ONLY: YOU WILL SEE: DO THIS: PRESS MODE BUTTON CHOOSE FAN ONLY TO USE THE ENERGY SAVER FEATURE: DO THIS: PRESS MODE BUTTON CHOOSE ENERGY SAVER LIGHT On Note: Use this function only when cooling is not desired, such as for room air circulation or to exhaust stale air. (Remember to open the vent during this function, but keep it closed during cooling for maximum cooling efficiency.) You can choose any fan speed you prefer. During this function, the display will show the actual room temperature, not the set temperature as in the cooling mode. YOU WILL SEE: LIGHT On Note: In this mode, the fan will continue to run for 3 minutes after the compressor shuts off. The fan then cycles on for 2 minutes at 10 minute intervals until the room temperature is above the set temperature, at which time the compressor turns back on and cooling stars. TIMER: DELAY STOP / START FEATURE FIRST DO THIS: PRESS TIMER BUTTON THEN DO THIS: PRESS TEMP/TIMER SET BUTTON YOU WILL SEE HOW MUCH TIME IS CHOSEN: LIGHT On Note: For Delay Stop, the unit must be in the On position. Note: For Delay Start, the unit must be in the Off position. To adjust timer setting, tap or hold the UP arrow( ) or the DOWN arrow( ) to change delay timer at .5 hour increments, up to 10 hours, then at 1 hour increments up to 24 hours. The control will count down the time remaining until start (8, 7.5, 7, etc.). The Delay Start mode automatically selects cooling with maximum Fan Speed. The temperature maintained will be the same as previously set. To change the set temperature, press "COOL" then Up or Down arrows until the desired temperature is indicated on the display. After 5 seconds, the control will automatically change the display back to the hours remaining until the unit will start/stop. Turning the unit "ON" or "OFF" at any time will cancel the Delay Start/Stop function. The Delay Start/Stop Feature will work until the unit either starts or stops. Once that happens the above steps have to be repeated again. 7

  • 1
  • 2
  • 3
  • 4
  • 5
  • 6
  • 7
  • 8
  • 9
  • 10
  • 11
  • 12

7
TO OPERATE ON FAN ONLY:
DO THIS:
PRESS MODE
BUTTON
CHOOSE FAN
ONLY
Note:
Use this function only when cooling is not desired, such
as for room air circulation or to exhaust stale air. (Remember
to open the vent during this function, but keep it closed during
cooling for maximum cooling efficiency.) You can choose any
fan speed you prefer.
During this function, the display will show the actual room tem-
perature, not the set temperature as in the cooling mode.
TO USE THE ENERGY SAVER
FEATURE:
DO THIS:
PRESS MODE
BUTTON
CHOOSE
ENERGY SAVER
Note: In this mode, the fan will continue to run for 3 minutes
after the compressor shuts off. The fan then cycles on for 2
minutes at 10 minute intervals until the room temperature is
above the set temperature, at which time the compressor turns
back on and cooling stars.
YOU WILL SEE:
YOU WILL SEE:
Air Conditioner Features
(continued)
LIGHT On
LIGHT On
TIMER: DELAY STOP / START
FEATURE
YOU WILL SEE HOW MUCH TIME IS CHOSEN:
LIGHT On
Note: For Delay Stop, the unit must be in the On position.
Note: For Delay Start, the unit must be in the Off position.
To adjust timer setting, tap or hold the UP arrow(
) or the DOWN
arrow(
) to change delay timer at .5 hour increments, up to 10
hours, then at 1 hour increments up to 24 hours. The control will count
down the time remaining until start (8, 7.5, 7, etc.). The Delay Start
mode automatically selects cooling with maximum Fan Speed. The
temperature maintained will be the same as previously set. To change
the set temperature, press “COOL” then Up or Down arrows until the
desired temperature is indicated on the display. After 5 seconds, the
control will automatically change the display back to the hours re-
maining until the unit will start/stop. Turning the unit “ON” or “OFF” at
any time will cancel the Delay Start/Stop function.
The Delay Start/Stop Feature will work until the unit either starts or
stops. Once that happens the above steps have to be repeated again.
FIRST
DO THIS:
PRESS
TIMER BUTTON
THEN
DO THIS:
PRESS
TEMP/TIMER
SET BUTTON
FIRST
DO THIS:
PRESS
TIMER BUTTON
THEN
DO THIS:
PRESS
TEMP/TIMER
SET BUTTON
FIRST
DO THIS:
PRESS
TIMER BUTTON
THEN
DO THIS:
PRESS
TEMP/TIMER
SET BUTTON
FIRST
DO THIS:
PRESS
TIMER BUTTON
THEN
DO THIS:
PRESS
TEMP/TIMER
SET BUTTON
FIRST
DO THIS:
PRESS
TIMER BUTTON
THEN
DO THIS:
PRESS
TEMP/TIMER
SET BUTTON
FIRST
DO THIS:
PRESS
TIMER BUTTON
THEN
DO THIS:
PRESS
TEMP/TIMER
SET BUTTON
FIRST
DO THIS:
PRESS
TIMER BUTTON
THEN
DO THIS:
PRESS
TEMP/TIMER
SET BUTTON
FIRST
DO THIS:
PRESS
TIMER BUTTON
THEN
DO THIS:
PRESS
TEMP/TIMER
SET BUTTON
FIRST
DO THIS:
PRESS
TIMER BUTTON
THEN
DO THIS:
PRESS
TEMP/TIMER
SET BUTTON
FIRST
DO THIS:
PRESS
TIMER BUTTON
THEN
DO THIS:
PRESS
TEMP/TIMER
SET BUTTON
FIRST
DO THIS:
PRESS
TIMER BUTTON
THEN
DO THIS:
PRESS
TEMP/TIMER
SET BUTTON