Frigidaire FAFW3801LW Wiring Diagram (All Languages) - Page 4
No, replace the heater assembly. - water valve
 |
UPC - 012505383175
View all Frigidaire FAFW3801LW manuals
Add to My Manuals
Save this manual to your list of manuals |
Page 4 highlights
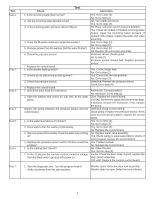
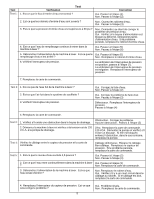
Test Check Test Correction Test 8: 1. Disconnect the plug from the drive motor and If the reading is between 80 & 130 Ohms, replace the speed measure the resistance pins 4 & 5 in the motor. control board. If the meter reads other than between 80 & 130 Ohms, replace the motor. Test 9: 1. Remove the belt from the motor and spin the motor No. Replace the motor. pulley. Does the motor spin free? Yes. Go to step (3) 2. Spin the tub pulley. Does the tub spin free? No. Check the tub bearings. Yes. Go to step (3) 3. Disconnect the plug from the motor and measure If the readings are correct, replace the speed control board. the resistance of the windings (pin 1 to pin 2, pin 1 If the readings are incorrect, replace the motor. to pin 3, pin 2 to pin 3). All readings should be between 4 and 6 Ohms. Test 10: 1. Remove the belt from the motor and spin the motor No. Replace the motor. pulley. Does the motor spin free? Yes. Go to step (3) 2. Spin the tub pulley. Does the tub spin free? No. Check the tub bearings. Yes. Go to step (3) 3. Disconnect the plug from the drive motor and If the meter reads other than between 80 & 130 Ohms, measure the resistance between pins 4 & 5 in the replace the motor. motor. If the reading is between 80 & 130 Ohms, Go to step (4) 4. Disconnect the plug from the motor and measure If the readings are correct, replace the speed control board. the resistance of the windings (pin 1 to pin 2, pin 1 If the readings are incorrect, replace the motor. to pin 3, pin 2 to pin 3). All readings should be between 4 and 6 Ohms. Test 11: 1. Communication problem. Check the wiring between Wiring bad. Correct wiring problem. the control board and the speed control board. Wiring good. Replace the control board. If the problem is not corrected, replace the speed control board. Test 12: 1. Check the resistance of the water valve NTC. Is it No. Replace the water inlet valve assembly around 50K ohms? Yes. Replace the control board. Test 13: 1. Have the power company check the frequency of the incoming power. If correct, replace the control board. Test 14: 1. Check the resistance of the heating element. It If the readings are incorrect, replace the heating element. should be approximately 14 ohms. 2. Check the resistance between ground and both heater terminals. It should be open when the heater terminals are disconnected. Test 15: 1. Check the resistance of the tub NTC. Is it around No, replace the heater assembly. 4.8K ohms? Yes, check the wiring - if good, rpl console control board. Test 16: 1. Check the wiring harness between the console If defective, correct wiring problem. control board & the interface board. If the harness is good and none of the LEDs light, replace the interface board. If this does not correct the problem, replace the console control board. Note: If only one of the LEDs will not light, replace the interface board. 4
-
 1
1 -
 2
2 -
 3
3 -
 4
4 -
 5
5 -
 6
6 -
 7
7 -
 8
8 -
 9
9 -
 10
10 -
11
-
12
-
13
-
14
-
15
-
16
 |
 |
