Frigidaire FAFW4221LB Wiring Diagram (All Languages) - Page 2
Start/Pause, Cancel, Options, Delay Start, SAFETY, ARNING
 |
View all Frigidaire FAFW4221LB manuals
Add to My Manuals
Save this manual to your list of manuals |
Page 2 highlights
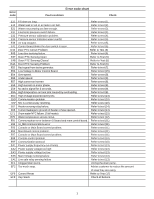
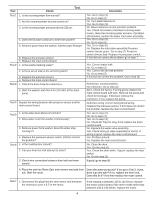
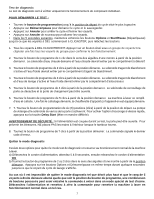
Diagnostic Test The diagnostic test is used to check individual component function only. TO START THE TEST: • Turn the Program Knob to the start position of the cycle furthest to the left • Press Start/Pause to start the cycle and save it. • Press Cancel to stop the cycle and turn off the LEDs. • Press Cancel again to turn on the LEDs. • Within 5 seconds, press and hold the Options and Start/Pause buttons until LEDs start FLASHING, then release buttons. 1. All the LEDs will FLASH. Pressing a button below a light cluster will light all the LEDs in that cluster at one time to confirm functionality. 2. Turn the program knob (1) click clockwise from the start position. The hot water solenoid will activate and hot water should enter through the detergent compartment. 3. Turn the program knob (2) clicks from the start position. The bleach water solenoid will activate and cold water should enter through the bleach compartment. 4. Turn the program knob (3) clicks from the start position. The bleach and the wash water solenoids will activate and cold water should enter through the softener compartment. 5. Turn the program knob (4) clicks from the start position. The door lock solenoid will deactivate and the loading door can be opened. 6. Turn the program knob (5) clicks from the start position. The washer will fill and tumble. Once tumbling has started, the Boost Heater (if so equipped) will turn on. 7. Turn the program knob (6) clicks from the start position. The drain pump & door lock solenoid will activate. To enable high spin, press the Delay Start button. SAFETY WARNING: If power is removed during this test, the door can be opened. To prevent injury, DO NOT put your hands inside when the tub is rotating. 8. Turn the program knob (7) clicks from the start position. The control will signal the last error code. Exiting Diagnostic Mode There are two options for exiting the Diagnostic Test mode and returning the washer to normal operation: a) Unplug the power cord, wait 5-8 seconds, then reconnect the power cord OR b) Turn the program knob clockwise 2 or 3 clicks after the start position. Press Options and Start/Pause buttons together for a few seconds until wash cycle LEDs appear. If a situation arises where you cannot exit the Diagnostic mode as described above and the bank of 5 LED's on the right end remain ON regardless of Program Knob position, a combination of pushed buttons may have caused the control to enter a special factory test mode. Disconnect power to reset the control to return washer to normal operation is this occurs. 2
-
 1
1 -
 2
2 -
 3
3 -
 4
4 -
 5
5 -
 6
6 -
 7
7 -
 8
8 -
9
-
10
-
11
-
12
-
13
-
14
-
15
-
16
 |
 |
