Frigidaire FAH08ER1T Installation Instructions - Page 4
Fedders or Friedrich
 |
UPC - 012505271984
View all Frigidaire FAH08ER1T manuals
Add to My Manuals
Save this manual to your list of manuals |
Page 4 highlights
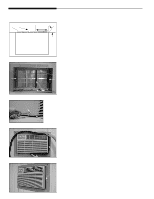
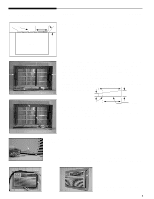
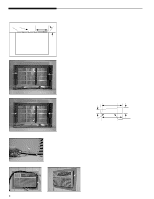
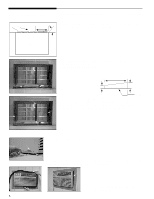
Wall Sleeve Brands: #3 Fedders or Friedrich 163⁄4"Deep Rear Louvers 60° 10-1/2" 1. Redirect the louvers at the back of the wall sleeve as shown in the illustration. The use of pliers is recommended. 60° Top View 2 ← 61⁄2"‹→ 2 3 ← 61⁄2"‹→ ← 101⁄2"‹→ 2. Attach (2) 41⁄2"x 31⁄2"x 11⁄2"Centering/Support Blocks to the inside of the walls of the wall sleeve as illustrated with tapered end facing the opening of the Sleeve. These (2) blocks should be located approximately in the center of the side walls. To attach the blocks remove the backing paper from the blocks. Do not touch adhesive on the blocks. Press the blocks firmly in place. 3. Cut (2) 17"Tapered Spacer Blocks and install as shown in the illustration. The 4"portion to be placed in front of the rib on base and tapered end facing the back of the sleeve. The remaining portion to be placed behind the rib. The 21⁄2"portion to be placed in front of the rib on the base with the tapered end facing the back of the sleeve. Cut the remaining portion to 121⁄2"and place behind the rib with the tapered end facing the back of the sleeve. 17" 4 4 4 1" 3/4" Tapered Spacer Block 5 6 Cut Here 12-1/2" 2-1/2" Protection Paper Backing 4. Attach (1) 11⁄2"x 11⁄2"x 261⁄2"long seals and the (2) 11⁄2"x 11⁄2"x 14"long seals as shown in the illustration. 5. Cut (1) 11⁄2"x 11⁄2"x 261⁄2"long seal to 14"and attach inside of the louvered panel as shown in the illustration. 6. Install the new unit into the wall sleeve. Attach the ground wire to the unit as shown. 7. Install the 1"x 11⁄2"x 84"long stuffer seal between the wall sleeve and the unit. A flat bladed screwdriver or putty knife is recommended. 7 4 7 8. Assemble and install the Trim Frame. (see Trim Frame)
-
 1
1 -
 2
2 -
 3
3 -
 4
4 -
 5
5 -
 6
6 -
 7
7 -
 8
8 -
 9
9 -
 10
10 -
11
 |
 |
