Frigidaire FARG4044MW Installation Instructions (English, Español, Fr - Page 18
short screw to the lower hinge. Once both screws
 |
View all Frigidaire FARG4044MW manuals
Add to My Manuals
Save this manual to your list of manuals |
Page 18 highlights
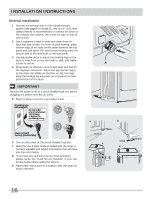
REVERSING DOOR 5 Install four long screws securing hinge to door assembly in the new location, take note to place each hinge in correct orientation. (Figure below) IMPORTANT The plate with the stamped "D" is mounted to the door. The "D" must be visible after the hinge is remounted and the spine of the hinge should be oriented toward the front side of the door for correct operation. 9 Install new striker (included in literature bag) into hole square plug was previously installed in. (Figure below) DOOR EDGE SCREWS (x 4) DOOR HINGE SCREWS (x 4) 10 Grasping firmly the top of the door, position the door near the door opening and align the top hinge hole to the top hole in the front panel door opening. Once the first short screw is started, attach the second short screw to the lower hinge. Once both screws are tightened, install the remaining two short screws. (Figure below) "D" STAMPED ON DOOR SIDE OF HINGE INTERIOR 6 Install four long screws into holes that had secured the hinges. (Figure above) 7 Remove striker and discard. (Figure below) HOLE PLUGS (x 4) "D" STAMPED ON DOOR SIDE OF HINGE INTERIOR 8 Remove square plug opposite striker. (Figure above) If plug is damaged during removal, discard and install new plug (included in literature bag) into hole striker was just removed from. 11 Install four plugs into the front panel door opening where hinges were originally installed. (Figure above) 12 Close the door and test operation of hinge, strike and latch. 18
-
 1
1 -
2
-
3
-
4
-
5
-
6
-
7
-
8
-
9
-
10
-
11
-
12
-
 13
13 -
 14
14 -
 15
15 -
 16
16 -
 17
17 -
 18
18 -
 19
19 -
 20
20 -
 21
21 -
 22
22 -
 23
23 -
24
-
25
-
26
-
27
-
28
-
29
-
30
-
31
-
32
-
33
-
34
-
35
-
36
-
37
-
38
-
39
-
40
-
41
-
42
-
43
-
44
-
45
-
46
-
47
-
48
-
49
-
50
-
51
-
52
-
53
-
54
-
55
-
56
-
57
-
58
-
59
-
60
 |
 |
