Frigidaire FARG4044MW Installation Instructions (English, Español, Fr - Page 19
Accessories
 |
View all Frigidaire FARG4044MW manuals
Add to My Manuals
Save this manual to your list of manuals |
Page 19 highlights
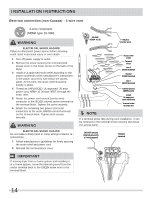
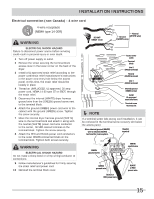
ACCESSORIES LP CONVERSION KIT P/N PCK4200 Gas dryers intended for use in a location supplied with LP must use a conversion kit prior to installation. MOBILE HOME INSTALLATION KIT P/N 137067200 Installation in a mobile home requires the use of a MOBILE HOME INSTALLATION KIT. CAUTION Failure to use accessories manufactured by (or approved by) the manufacturer could result in personal injury, property damage or damage to the dryer. DRYING RACK P/N 137067300 Depending on the model you purchased, a drying rack may have been included in the initial purchase of your dryer. If your model did not include a drying rack or you desire another drying rack, you may order one. UNIVERSAL APPLIANCE WRENCH P/N 137019200 A UNIVERSAL APPLIANCE WRENCH is available to aid in dryer or washer feet adjustment. TOUCH UP PAINT PENS* Classic White Touch Up Pen - P/N 5304468812 *Other colors may be available. Contact the source where you purchased your dryer. Technical Sheet/Wiring Diagram: Í NOTE A wiring diagram and technical data sheet are located inside the dryer console. To remove the console faceplate follow the directions below: 1. Disconnect dryer from electrical source. 2. Remove the hole plugs on the back of the console housing. 3. Insert a small, straight blade screw drive to gently pry downward on each faceplate retaining tab. 4. Gently lay the console faceplate forward without pulling wires to access technical/wiring diagram. 5. When finished with repair, return sheet inside console, snap faceplate to console housing and reinstall hole plugs. TECH DATA SHEET/ WIRING DIAGRAM Replacement parts: If replacements parts are needed for your dryer, contact the source where you purchased your dryer or refer to your Use and Care Guide for more information. WARNING ELECTRICAL SHOCK HAZARD Label all wires prior to disconnection when servicing controls. Wiring errors can cause improper and dangerous operation. Verify proper operation after servicing. 19
-
 1
1 -
2
-
3
-
4
-
5
-
6
-
7
-
8
-
9
-
10
-
11
-
12
-
13
-
 14
14 -
 15
15 -
 16
16 -
 17
17 -
 18
18 -
 19
19 -
 20
20 -
 21
21 -
 22
22 -
 23
23 -
 24
24 -
25
-
26
-
27
-
28
-
29
-
30
-
31
-
32
-
33
-
34
-
35
-
36
-
37
-
38
-
39
-
40
-
41
-
42
-
43
-
44
-
45
-
46
-
47
-
48
-
49
-
50
-
51
-
52
-
53
-
54
-
55
-
56
-
57
-
58
-
59
-
60
 |
 |
