Frigidaire FAS226R2A Installation Instructions - Page 4
Install Support, Bracket
 |
UPC - 012505271878
View all Frigidaire FAS226R2A manuals
Add to My Manuals
Save this manual to your list of manuals |
Page 4 highlights
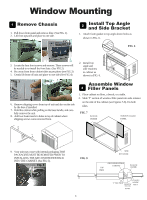
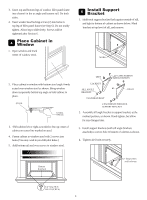
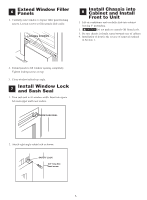
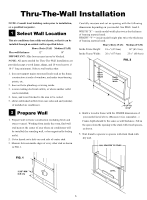
3. Insert top and bottom legs of window filler panel frame into channel in the to angle and bottom rail. Do both sides. 4. Insert washer head locking screws (2) into holes in top leg of filler panel frame (see Step 6). Do not totally tighten. Allow leg to slide freely. Screws will be tightened after Section 6. 4 Place Cabinet in Window 1. Open window and mark center of window stool. 5 Install Support Bracket 1. Hold each support bracket flush against outside of sill, and tight to bottom of cabinet as shown below. Mark brackets at top level of sill, and remove. MARK 2. Place cabinet in window with bottom stool angle firmly scated over window stool as shown. Bring window down temporarily behind top angle to hold cabinet in place. STOOL STOOL ANGLE 3. Shift cabinet left or right as needed to line up center of cabinet on center line marked on stool. 4. Fasten cabinet to window stool with 2 screws into holes.(You may wish to pre-drill pilot holes.) 5. Add bottom rail seal over screws to window stool. LEFT 1/2" LONG SCREWS AND LOCKNUTS LOCKNUT SILL ANGLE BRACKET RIGHT FLAT HEAD BOLT 2 EACH REQ'D FOR EACH SUPPORT BRACKET 2. Asscmble sill angle bracket to support brackets at the marked position, as shown. Hand tighten, but allow for any changes later. 3. Install support brackets (with sill angle brackets attached) to correct hole in bottom of cabinet as shown. 4. Tighten all 6 bolts securely. Bottom Rail Seal 1/2" long screws and locknuts 3/4" long HEXHEAD SCREW 4
-
 1
1 -
 2
2 -
 3
3 -
 4
4 -
 5
5 -
 6
6 -
 7
7 -
 8
8
 |
 |
