Frigidaire FFHP124CS1 Installation Instructions - Page 11
Connective pipe, Drainage
 |
View all Frigidaire FFHP124CS1 manuals
Add to My Manuals
Save this manual to your list of manuals |
Page 11 highlights
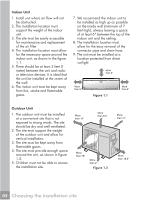
Connective pipe and drainage installation Connective pipe 1. For the left-hand and right-hand piping, remove the pipe cover from the side panel. The pipe cover can be kept as it may be used when relocating the air conditioner to any other place. 2. For the rear-right-hand and rearleft-hand piping, install the piping as shown in figure 1.4. Bend the connective pipe to be laid at a height of 1-11/16" or less from the wall. Fix the end of the connective pipe. Pipe cover (right) Pipe holder Pipe cover (left) Left piping Right piping Rear right piping Figure 1.4 Rear left piping Indoor unit outline Connective pipe 1-11/16" Drainage 1. Run the drain hose sloping downward. Do not install the drain hose as illustrated in figure 1.5. 2. When connecting extension drain hose, insulate the connecting part of extension drain hose with a shield pipe, do not let the drain hose slack. Do not block water flow by a rise. Do not block water flow by a rise. Do not put the end of drain hose into water. Fastening the Indoor Unit 1. Pass the piping through the hole in the wall. 2. Put the upper claw at the back of the indoor unit on the upper hook of the wall mounting bracket, move the indoor unit from side to side to see that it is securely hooked. Figure 1.5 Upper hook Lower hook Indoor unit installation 10
-
 1
1 -
2
-
3
-
4
-
5
-
 6
6 -
 7
7 -
 8
8 -
 9
9 -
 10
10 -
 11
11 -
 12
12 -
 13
13 -
 14
14 -
 15
15 -
 16
16 -
17
-
18
-
19
-
20
-
21
-
22
-
23
-
24
-
25
 |
 |
