Frigidaire FFTR1425VW Complete Owners Guide - Page 9
Using a T25 Torx Head screwdriver, see C.
 |
View all Frigidaire FFTR1425VW manuals
Add to My Manuals
Save this manual to your list of manuals |
Page 9 highlights
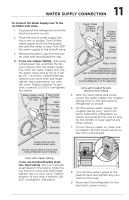
A B Refrigerator Door Bottom C DOOR REMOVAL 9 A B Freezer Door Bottom C Figure 6 IMPORTANT Due to use over time, the door closer might get slightly deformed. Use pliers to adjust the door closer to fit inside the endcap slot Figure 7 IMPORTANT Due to use over time, the door closer might get slightly deformed. Use pliers to adjust the door closer to fit inside the endcap slot 23. Using a T25 Torx Head screwdriver, attach the center hinge with the 3 center hinge screws. 24. With the door open 90º, lower the refrigerator door over the bottom hinge pin. Manually attach the center hinge pin and close the door. 25. Using 5/16 in. socket, tighten the center hinge pin. 26. Using a flathead screwdriver, pry out the top hinge bearing plug from the opposite side of the freezer door. 27. Using a hammer, gently tap the top hinge bearing plug removed in the previous step. 28. By hand, reinstall the top hinge bearing plug on the opposite side of the door. 29. Flip freezer door over and remove the screw from the door closer using a Phillips Head screwdriver and set aside (see Figure 7B). 30. Pry out the center hinge bearing from the freezer door with a straight screwdriver (see Figure 7A). 31. Using a hammer, gently tap the center hinge bearing all the way in on the opposite side of the door (see Figure 7C). 32. Flip the door closer over and install on the opposite side of the door (see Figure 7C). 33. Using a 5/16" socket, attach the top hinge with the 3 screws (approx. ⅜ in. - 9 mm). Do not tighten. 34. With the freezer door open 90°, lift the loosened top hinge and lower the door over the center hinge pin. Close the door. 35. Tighten the top hinge screws and check door the door alignment and door sealing. Reinstall the top hinge cover. 36. Plug the refrigerator in an electrical outlet.
-
 1
1 -
2
-
3
-
 4
4 -
 5
5 -
 6
6 -
 7
7 -
 8
8 -
 9
9 -
 10
10 -
 11
11 -
 12
12 -
 13
13 -
 14
14 -
15
-
16
-
17
-
18
-
19
-
20
-
21
 |
 |
