Frigidaire FGEF306TMF Complete Owner's Guide (English) - Page 27
Setting Self-clean Cycle Time Length
 |
View all Frigidaire FGEF306TMF manuals
Add to My Manuals
Save this manual to your list of manuals |
Page 27 highlights
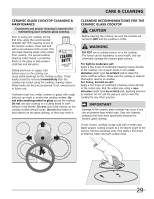
SELF-CLEANING SETTING SELF-CLEAN CYCLE TIME LENGTH The SELF CLEAN pad controls the Self-Cleaning feature. If you are planning to use the oven directly after a selfclean cycle remember to allow time for the oven to cool down and the oven door to unlock. This normally takes about one hour. So a 3 hour self-clean cycle will actually take about 4 hours to complete. *It is recommend to use a 2 hour self-clean cycle for light soils, a 3 hour cycle for average soils, and a 4 hour cycle for heavy soils (to assure satisfactory results). To set the controls for a 3 hour Self-Cleaning cycle to start immediately and shut off automatically 1. Be sure the clock is set with the correct time of day and the oven door is closed. 2. Press UPPER or LOWER to select oven. 3. Press SELF CLEAN. "3:00" and CLn will show in the display. The control will automatically clean for a 3 hour period (default self-cleaning cycle time). For the first 10 seconds, "Remove Racks" will flash and beep to remind you that the racks need to be removed. NOTE If a 2 or 4 hour clean time is desired, press SELF CLEAN multiple times to toggle between 2, 3 or 4 hours. 4. Press START. The "DOOR" icon will flash. 5. As soon as the control is set, the motor driven oven door lock will begin to close automatically. Once the door has been locked the "DOOR" indicator light will stop flashing and remain on and the icon will appear. Also, the oven icon will appear in the display. NOTE Allow about 15 seconds for the oven door lock to close. When the Self-Clean Cycle is Completed 1. "HOT" will appear in the display. The time of day, the "DOOR" and icon will remain in the display. 2. Once the oven has cooled down for approximately 1 HOUR, and the "DOOR" is no longer displayed, the oven door can then be opened. Stopping or Interrupting a Self-Cleaning Cycle If it becomes necessary to stop or interrupt a self-cleaning cycle due to excessive smoke or fire in the oven: 1. Press CANCEL. 2. The oven door can only be opened after the oven has cooled down for approximately 1 HOUR and the "DOOR" and icons are no longer displayed. The SELF CLEAN and DELAY START pads controls the Delayed Self-Clean operation. The automatic timer will turn the oven on and off at the time you select in advance. To set the control for the Self-Cleaning Cycle to start at a delayed time and shut off automatically (example: 3 hour self-clean cycle to start at 4:30) 1. Be sure the clock is set with the correct time of day and the oven door is closed. 2. Press UPPER or LOWER to select oven. 3. Press SELF CLEAN. "3:00" and CLn will show in the display. The control will automatically clean for a 3 hour period. For the first 10 seconds, "Remove Racks" will flash and beep to remind you that the racks need to be removed. NOTE If a 2 or 4 hour clean time is desired, press SELF CLEAN multiple times to toggle between 2, 3 or 4 hours. 4. Press START. The "DOOR" icon will flash. 5. As soon as the control is set, the motor driven oven door lock will begin to close automatically. Once the door has been locked the "DOOR" indicator light will quit flashing and remain on and the icon will appear. 6. Press DELAY START. Enter the desired start time using the number pads 4 3 0. 7. Press START. "DELAY", "DOOR LOCKED" and "CLEAN" icons will remain on. 8. The control will start the self-cleaning at the set start time, for the period of time previously selected. At that time, the icon "DELAY" will go out; "CLn" and oven icon will appear in the display. When the Self-Clean Cycle is Completed 1. "HOT" will appear in the display. The time of day, the "DOOR" and icon will remain in the display. 2. Once the oven has cooled down for approximately 1 HOUR, and the "DOOR" is no longer displayed, the oven door can then be opened. Stopping or Interrupting a Self-Cleaning Cycle If it becomes necessary to stop or interrupt a selfcleaning cycle due to excessive smoke or fire in the oven: 1. Press CANCEL. 2. The oven door can only be opened after the oven has cooled down for approximately 1 HOUR and the "DOOR" and icons are no longer displayed. NOTE The surface elements and the 2nd oven cannot be activated when the Self-Clean feature is active (see the section: The electronic surface element control (ESEC)). 27
-
 1
1 -
2
-
3
-
4
-
5
-
6
-
7
-
8
-
9
-
10
-
11
-
12
-
13
-
14
-
15
-
16
-
17
-
18
-
19
-
20
-
21
-
 22
22 -
 23
23 -
 24
24 -
 25
25 -
 26
26 -
 27
27 -
 28
28 -
 29
29 -
 30
30 -
 31
31 -
 32
32 -
33
-
34
-
35
-
36
 |
 |
