Frigidaire FGET3066UF Installation Instructions - Page 7
Install the Bottom Trims - installation manual
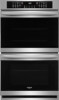 |
View all Frigidaire FGET3066UF manuals
Add to My Manuals
Save this manual to your list of manuals |
Page 7 highlights
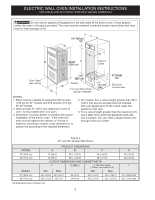
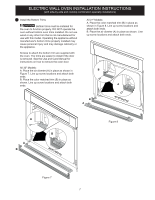
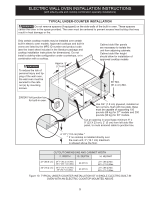
ELECTRIC WALL OVEN INSTALLATION INSTRUCTIONS (with side-by-side and cooktop combination specialty installations) 7 Install the Bottom Trims Bottom trims must be installed for the oven to function properly. DO NOT operate the oven without bottom oven trims installed. Do not use wood or any other trim that is not manufactured for use with this model. Operating the appliance without manufacturer's bottom trims properly installed may cause personal injury and may damage cabinetry or the appliance. Screws to attach the bottom trim are supplied with the oven. The trims are easier to install if the door is removed. See the Use and Care Manual for instructions on how to remove the oven door. All 30" Models: A. Place the air diverter (A) in place as shown in Figure 7. Line up screw locations and attach both ends. B. Place the color matched trim (B) in place as shown. Line up screw locations and attach both ends. All 27" Models: A. Place the color matched trim (B) in place as shown in Figure 8. Line up screw locations and attach both ends. B. Place the air diverter (A) in place as shown. Line up screw locations and attach both ends. B A B A A B A B Figure 8 Figure 7 7
-
 1
1 -
 2
2 -
 3
3 -
 4
4 -
 5
5 -
 6
6 -
 7
7 -
 8
8 -
 9
9 -
 10
10 -
 11
11 -
 12
12 -
13
-
14
-
15
-
16
-
17
-
18
-
19
-
20
-
21
-
22
-
23
-
24
-
25
-
26
-
27
-
28
-
29
-
30
-
31
-
32
 |
 |
